Just like you you can open command prompt i Windows and hit
“ipconfig” to get your local LAN/WLAN IP address, you have the same
option on a Mac in OS X with the command “ifconfig”. Open terminal, eg. by pressing cmd+space and typing “terminal”. Type “ifconfig” and hit enter.
Another option is to open up “System Preferences”, type “Network” and open it up.
If you spend any time
working in the command line, particularly using SSH to log into remote
computers, then you may be wondering how you can easily find the IP
address of the current machine you're on. While you certainly could just
look up the IP address in the System Preferences Network pane, looking
this information up in the Terminal looks cooler and is quite a bit
faster. Continue reading and we'll show you how it's done. To
look up your IP address, simply type the following command into the
command line in your Terminal application (located in
/Applications/Utilities):
ipconfig getifaddr en0
If
you are using Ethernet, or on a Mac without wired networking built in,
then you will see your IP address; if you are running a Mac that has
both wired and wireless connections, then you will need to substitute
"en0" with "en1". This will tell the ipconfig command to only get the IP
address associated with the interface "en1". If
you are running a late-2013 MacPro, or another type of Mac that has
multiple interfaces, then you may need to use the following command to
view a list of all of your interfaces, then specify the in-use interface
in the command above.
ipconfig
Running the
ipconfig command, the program will output a list of all the connected
interfaces, and let you see which one is currently being used for your
LAN connection. The one listed with an "inet" address that is not
"127.0.0.1" is usually the interface that you're connected through.
an application that makes a perfect clone, of a Mac’s hard drive, on
a different hard drive. When you use it to back up a Mac, it copies the
entire operating system—along with all the applications, files and
almost everything else. This gives it a couple of advantages over other
backup solutions such as OS X’s built in Time Machine.
In this
tutorial I’ll show you how to start using SuperDuper! clones as a
backup, how to access the backups—if you need to—and how to restore from
them.
You Never Need a Backup—Until You Do
Backing
up is the digital equivalent of eating kale—everyone knows it’s a good
idea, all the experts rave about it and yet, almost nobody does it.
The problem is that modern computers are so good that it is very easy to go years without ever needing a backup; you might lose the odd file that you accidentally deleted but, for the most part, you’ll get by okay.
When
disaster does strike, and it will, the work you’ve done, photos you’ve
taken and movies you’ve downloaded are wiped in one fell swoop. You’re,
digitally, back to square one.
All of this can be prevented with a solid back up plan. Tuts+ author, Marius, has written a great tutorial on creating a totally foolproof backup system. If you want to ensure you never lose a single byte of data, read his tutorial carefully.
Cloning Explained
OS
X’s built in backup service, Time Machine, is great. Where it really
excels is keeping versioned backups of your files and applications over
time. If something goes wrong with an application update or you misplace
a file, it’s easy to use a Time Machine backup from a week, a day or an
hour ago to sort everything out.
Time Machine, unfortunately,
does not back up the operating system files. If the worst comes to the
worst and you need to restore your entire computer, you first need to
reinstall OS X—which if you have a Mac without a recovery partition, involves a five gigabyte download—and then restore everything from Time Machine.
I
had to do this once and it was an overnight process for a 128GB MacBook
Air; I can only imagine doing it with a computer with a multi-terabyte
drive. With a SuperDuper! clone, the operating system is backed up
alongside the user files. To perform a recovery, all you have to do is
reverse the cloning procedure and copy all the data back from your
backup to the Mac.
Further, while you can access the files you’ve
backed up with Time Machine using someone else’s Mac, you may run into
issues where they do not have the right applications installed, or the
right privileges to access your files.
With a SuperDuper! clone
you can even boot directly from your backup. You use someone else’s Mac
as a dumb terminal to access a perfect copy of your out-of-action Mac.
Preparing the Backup Drive
You
need a second hard drive to which to backup. Unless you’re using an
older Mac Pro or you’ve built your own Hackintosh, this is most likely
going to be an external drive. It needs to be at least the same size as
your Mac’s main drive; anything smaller and it won’t be able to contain
the clone.
Plug the external drive into the Mac and open Disk Utility. It’s in the Other folder in Applications.
Select the backup drive from the left sidebar and navigate to the Partition tab.
In the Partition Layout dropdown, select 1 Partition. Give the drive a descriptive name and select Mac OS Extended (Journaled) from the Format dropdown.
Click Apply and wait for a few moments for SuperDuper! to do its thing.
Configuring the backup drive in Disk Utility.The backup drive is now configured.
Creating the Clone Drive
SuperDuper! is a free app—although you can unlock some, useful, extra features with a one-time $27.95 payment. Backing up my OS X drive.
Download a copy of SuperDuper!
Agree to the licensing terms, drag the SuperDuper! to the Applications folder and run it.
To create a clone, select your main hard drive in the first dropdown menu, the backup drive in the second and Backup – all files in the third.
Click Copy Now and let SuperDuper! work.
SuperDuper! doing its thing.Once
SuperDuper! has copied across all the files you have a perfect clone of
the Mac’s hard drive. You can access all of the files by connecting the
backup drive to a Mac—the file system should look familiar.
All the files will be in the exact same folder structure as on the original drive. The backup drive with my familiar file system.
Advanced Options
SuperDuper!
is a powerful application—as a free app you can create a perfect clone
of your Mac, however, once you pay you get access to more features. The
two most important additional options are smart updates and scheduling.
As
you will likely have noticed when you created your clone drive, it
takes a while for several hundred gigabytes of data to copy over USB.
Smart updates are far faster—instead of creating a new clone from
scratch every time you backup, when SuperDuper! performs a smart update,
it only copies over the files that have changed. A few gigabytes rather
than several hundred.
To perform a smart update, under Options… select Smart Update from the During copy dropdown menu instead of Erase then copy.
A backup is not much use if you don’t keep it up to date. With SuperDuper! you can set up a backup schedule. Use the Schedule… dialogue to set up times for SuperDuper! to automatically run.
If
you leave your Mac turned on over night, that is the perfect time to do
it. Otherwise, lunch breaks or first thing in the morning while you get
ready for your day are good times. You can have multiple scheduled
backups going for different times and days.
Booting From the Clone
The
advantage of a SuperDuper! clone, over other solutions, is that you
have a working, bootable copy of your Mac sitting on a hard drive. If OS
X gets unstable after it updates, you install a new app or your Mac
even becomes infected with malware, you can connect your cloned drive and use it to boot up into a version of your system that you know is stable.
You
can even use any Mac, not just your own, to boot from the cloned hard
drive. If your Mac gets completely destroyed, you can use a friend or
family member’s Mac just like it is your own—complete with all the niche
apps—until you can replace it.
If you only have a Time Machine
backup, you might still have all your files, but unless your friends
have the same apps you do, you won’t be able to do much with them.
To boot from a clone:
Shutdown and connect the external clone drive to the Mac
Power on the Mac and as soon as you hear the startup chimes, hold down the Option key
until the Apple Logo appears on screen. This activates the Startup
Manager where you can choose what device you want to boot from
Select the clone drive and press Return
The system will now boot up. If you are used to a Mac with a
SSD, it is going to be excruciatingly slow—not only is all the data
being pulled from a spinning disk drive, but it’s being sent over USB as
well. Despite this, it will boot and you’ll be up and running with a
clone of the Mac.
When you are running someone else’s Mac with
your cloned drive, you may have some slightly odd behaviour and reset
preferences. This is normal—SuperDuper! only copies the preferences that
it’s safe for it to do so. Some preferences are dependent on things
like the Mac’s hardware so they have to be recreated or restored to
their defaults if a new Mac tries to use them.
Restoring From the Clone
If disaster
strikes and you need to restore your entire system from your SuperDuper!
backup, use your Mac to boot from the clone drive. Run SuperDuper! and
select the backup drive from the Copy dropdown and the main hard drive in the to dropdown. Choose Restore – all files and then click Copy Now.
Once SuperDuper! has run, restart the Mac and hold Option to boot to the Startup Manager. Choose your newly restored main drive and you’re done.
Conclusion
In
this tutorial I’ve shown you how to improve your backup system by using
SuperDuper! to make a total clone of your hard drive. A clone gives you
more options than a regular backup because you preserve the operating
system as well. SuperDuper! is an awesome app and you would do well to
consider using it in your backup plan.
It’s not the only application that creates clones—my colleague Adam has written an equivalent tutorial on SuperDuper!’s main competitor, Carbon Copy Cloner.
If
you’ve any questions about SuperDuper! or think I’m a heathen for
choosing it over Carbon Copy Cloner, please let me know in the comments.
If you’re working in
Terminal on your Mac, you need to know the most important UNIX
commands: those that work with directories, those that work with files,
and miscellaneous but commonly used commands.
Folders are called directories in UNIX. Commands that refer to
filenames, as most do, assume that you’re talking about files in the
working directory. When you open the Terminal window, the working
directory is set to your home directory, abbreviated ~. Bash shows you
the current working directory and your username to the left of its
prompt. The following table lists common directory-related commands.
UNIX Directory Commands
Command
What It Does
ls
Lists the names of the files in the working directory. For more
complete information, use ls –alF (.
cd directoryname
Changes the working directory to the one you named.
cd ..
Brings you up one directory level.
cd
Returns you to your home directory.
pwd
Displays the pathname of the current directory.
mkdir newdirectoryname
Makes a new directory.
rmdir directoryname
Removes (deletes) an empty directory.
As in Windows, you can redirect the output of a command
to a text file. So if you want a record of the files in a folder, type
cd, followed by a space, drag the folder’s icon to the Terminal window,
and press Return. Type ls > mydirectorylist.txt and press Return
again. A file named mydirectorylist.txt will appear in the folder you
chose. You can open the file in TextEdit to see a list of the files in
that directory.
This table lists commands commonly used when working with files in the Terminal window.
Working with Files
Command
What It Does
cp filename1 filename2
Copies a file.
chmod
Changes permissions for access to a file. Study the man page
before using this one.
diff
Compares two files line by line (assumes text).
more filename
Displays a text file one page at a time. Press the spacebar to
see the next page; press Q to quit. The man command works through
more.
mv filename1 filename2
Moves a file or changes its name.
rm filename
Removes (deletes) a file.
This last table explains other handy commands that anyone getting started in Terminal will likely want to know.
Miscellaneous Commands
Command
What It Does
Control+C
Terminates most operations.
date
Displays the current date and time.
echo
Repeats whatever appears after the command (after
expansion).
help
Displays a partial list of bash commands.
history
Displays the last commands you typed. You can redo a command by
typing an exclamation point (!) followed immediately (no space) by
the number of that command in the history list. To repeat the last
command, type !!. To repeat the last filename, type
!*.
pico
A simple UNIX text editor.
ps
Displays a list of running processes.
sudo
Lets you carry out commands for which the account you are using
lacks authority. You will be asked for an administrator’s
password.
When you’re working in Terminal, you don’t have a
Trash Can to which deleted files are moved pending ultimate disposal.
Delete it, and it’s gone. In general, UNIX has no Undo function.
The Terminal in OS X is often, in my opinion anyway, an overlooked
area of the operating system. Most newcomers to Macs look at it with
fear, as the sight of anything code-related or advanced is enough to put
them off for life. Fortunately, you don't have to be scared of Terminal
and think of it as a feature just for the tech-minded. Knowing some
basic Terminal commands can really enhance your experience of OS X. So,
for all the beginners out there, here is my pick of the top 10 Terminal
commands that every Mac user should know.
Before We Start...
Before we start tinkering around with it, it is probably worth taking
a couple of minutes to tell you exactly what Terminal is (all in a
non-technical sense, of course!). Terminal.app running under OS X (Lion)
Terminal (officially called Terminal.app) is, strictly speaking, an emulator
and works off most typical UNIX commands (OS X is a UNIX-based system,
as opposed to Windows, which is NT-based). Unlike OS X, which has a
graphical user interface (shortened to GUI), Terminal works off a
text-based interface and all commands have to be typed in - this may be
the reason why some people are scared off by it!
We won't go into massive detail on how Terminal works but it's best
to learn the following three commands before we start this tutorial:
ls - list the contents of a particular directory
cd - change to another directory (as in DOS)
sudo - authenticate yourself a superuser to gain extra security privileges
Tip: Be extra careful when using the sudo
command. You will usually have to enter your OS X system password and
any mistakes can permanently mess up your system for good. When in
doubt, leave it out!
For people like me who write a lot of foreign accents then the pop-up
accent window that came up when you hold down a letter for a longer
period is extremely useful. But for those of you who want to write lots
of repeat letters, it can be quite annoying. Use this simple trick to
disable it:
Hit Return then log out then back in again to see the changes. If you want to change back to the norm, then simply substitute false for true in the above.
2. Change the Default Backup Periods in Time Machine
By default, Time Machine backs up every hour when it's connected but
this can be changed through Terminal. To do so, simply enter the
following command:
This makes Time Machine backup now every 30 minutes. To change it to what you want, simply replace the 1800 with the interval time in seconds (so 15 minutes would be 900 seconds, therefore enter 900). Also be aware that you are using a sudo command,
so make sure that you've typed the command exactly right before you hit
Enter (and you'll also be prompted to enter your system password).
3. Drag Dashboard Widgets onto the Desktop
I always forget that the Dashboard exists on my Mac. In fact, I
hardly ever see a need for it. But I think that's mostly down to the
fact that the widgets are hidden away inside the operating system. To be
able to drag your Dashboard widgets onto your desktop, then enter the
following command:
1
defaults write com.apple.dashboard devmode YES
You must log out then back in again and to drag a widget onto your
desktop click and hold down on it then press F12, which dismisses it
from the Dashboard and allows you to drop it onto the desktop. Your
widgets now float above open applications, similar to the Gadgets on
Windows 7.
To disable this feature, simply replace YES with NO in the above command. Again, you'll have to log out then back in again, unfortunately.
This really bugged me when I first upgraded to Lion - the fact that
when you open up something like Preview, all your recently accessed PDFs
coming popping up in your face, even if you closed them down properly.
Unfortunately there's no universal command to disable it across the
entire OS so you'll have to do it for each individual program. If you
want to disable it for Preview, then enter the following command:
Make sure you quit and restart the apps to see the changes and if you want to reverse anything, simply substitute false for true (I'm sure you're getting the hang of this by now!).
5. Show Hidden Files in Finder
By default, the Finder in OS X hides some files away from view
(mostly irrelevant ones) but if you want to see everything on your
computer, then enter in the following command:
Again, substitute false for true to hide them again.
6. Change the File Format for Screenshots
Screenshots using the built-in shortcut for OS X are really useful
but by default they are saved as PNG files. If you want to change this,
then type in the following command:
Replace file-extension with the three letter abbreviation of your desired file format, so for JPEG format simply enter JPG and for Acrobat PDF format, PDF. Terminal doesn't have to be difficult, does it?
7. Kill the Dashboard Altogether
Above, we went over the command to drop Dashboard widgets onto the
desktop, but if you want to get rid of the Dashboard altogether (for
example, if you're running an older Mac and have memory issues) then you
can do via this simple Terminal command:
Then, restart the Dock using the following command:
1
killall Dock
Et, voilà! No more Dashboard. If you find yourself afterwards lamenting after the good old days, replace YES with NO in the top command and repeat the process.
8. Securely Erase Free Space
When you delete files on your Mac, OS X still leaves fragments of the
file all over the free space on your hard disk drive, until these are
written over by new files. If you want to securely delete all the
remaining fragments on a hard disk drive (for example if you're going to
sell your Mac), then execute the following command:
Replace /name-of-drive with the drive you want to
erase. This command uses a special algorithm to wipe over each free area
of space 35 times, far above the US Department of Defense's standard,
which only requires 7 passes. Be aware though that this process can take
days on larger drives.
On a side note, the command diskutil is a really
useful one and allows you to manage local disks and volumes directly
from the Terminal (a list of sample commands is given). Be aware,
though, that most commands require root access.
9. Control Your Mac Remotely
Being able to control your Mac remotely via SSH, or secure shell, is
far more advantageous than screen sharing as it uses less system
resources and less bandwidth. The first thing you will have to do is
enable Remote Login on your Mac, which you can do by heading over to System Preferences then Sharing then click on Remote Login. Be sure to enable Remote Login on your Mac before you start anything
A little green light should come up, along with an IP address that
you can use to log in via Terminal. The connection between the local Mac
you're using and the remote one (i.e. your own one) is secure and
encrypted, meaning that any data being transferred between the two
cannot be intercepted.
To log into your Mac on another Mac, execute the command:
1
ssh-l username remote-address
Replace username with the username you'd use to log into OS X and remote-address with
the IP address given to you in the Sharing pane. You can now control
your Mac and execute Terminal commands remotely, a real plus.
10. Talking Mac!
And last but not least, if you want your Mac to speak to you, then simply use the say command, as in:
1
say Hello World!
The words will be spoken in your Mac's default voice but if you want to change this, then simply head over to System Preferences then either Dictation and Speech (on Mountain Lion) or simply Speech (on
Lion). Here you can select different voices and download new ones from
Apple's servers if you fancy. Another "useful" feature is the ability to
convert an entire text file into speech, if you so fancy. Simply enter:
1
say -o audio.aiff -f FILENAME.txt
Replace FILENAME.txtwith your own file. This will create a reading of your file as an AIFF file audio.aiffin Terminal's default directory. Tip: Ever wondered if the Mac operating system is
pronounced "OS ten" or "OS ex?" Your Mac knows the answer! Try typing
"say OS X" into Terminal. The result may surprise you.
Conclusion
I hope that this little tutorial has helped you demystify the
Terminal and realize that it's really not that bad to use – you can
achieve a lot more using it and if you want to customize OS X beyond
simply changing the wallpaper, then it really is your first port of
call.
I hope you have plenty of fun with the commands mentioned above,
please feel free to share your own favourites in the comments section
below for the benefit of all Mactuts+ readers!
The Terminal is an exceptionally powerful tool, providing a command
line interface to the underpinnings of OS X. It’s a topic we’ve covered
at length before with our popular series Taming the Terminal.
There’s a great deal that Terminal can do, from moving large numbers
of files to changing preferences that we didn’t even know exist. To
demonstrate just how versatile the Terminal is, I’ve rounded up 40 truly
excellent Terminal tips and tricks that can come in very handy.
Before We Begin
All of the Terminal commands I’ll be showing you are perfectly safe
to use and, when it comes to changing preferences, are completely
reversible. Saying that, the Terminal is a fickle creature and leaves no
margin for error so make sure you’re entering the commands exactly as
they are written here.
As always, make sure you have a recent backup in case something does happen.
Tip: If you’re unfamiliar with Terminal, I would strongly encourage you to read our introductory series on the topic, Taming the Terminal. Terminal isn’t for the faint of heart and we’d rather you be comfortable entering some of these commands.
Entering Terminal
The Terminal window
Terminal is located in the Applications > Utilities folder. Once opened, you can then start entering commands.
Within Terminal, you’ll see something like this:
1
MacBook:~ jordan$
This is the prompt, where we enter our commands. To correctly identify how to enter a command, I will be using a dollar sign ($) to signify the prompt, so simply enter the command that follows a dollar sign.
Let’s warm up with some basic commands!
Clear the Window
1
$ clear
Simply put, this clears the current window. (Within Terminal in OS X,
you can still scroll up to see what was there. This command simply
clears the current view).
Navigating to Folders
You can navigate to a folder, such as Utilities, by typing the following command:
1
$ cd /Applications/Utilities
If you want to quickly jump back to your home folder, you can simply enter:
1
$ cd
With folders that contain spaces, there’s two ways you can do it:
1
2
$ cd /Volumes/Macintosh\ HD/
$ cd "/Volumes/Macintosh HD/"
The first method uses the \ back slash to “escape” the space. Since
the command line treats spaces as part of commands, the \ character
tells Terminal to ignore the space that immediately follows.
Alternatively, you can simply wrap the folder’s path in quotation marks
and any spaces it contains will be ignored. Navigate back to your home folder before continuing.
List the Contents of a Directory
You can view the contents of a folder by entering:
1
$ ls
The default output of 'ls'
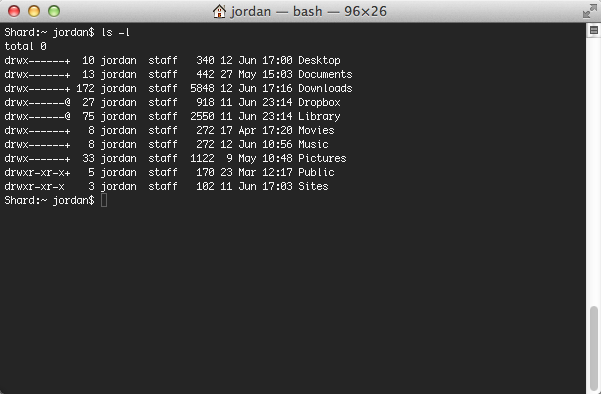
To view it in a list format, enter:
1
$ ls -l
The output of 'ls' with the '-l' flag
If you want to view all files, including hidden ones:
1
$ ls -a
The above command will display all files, including those hidden ones
that start with a period. What if we want to view the folder as a list
but also view all the hidden files?
1
$ ls -la
Yep, it’s as simple as combining them together! I think you’re suitably warmed up, so let’s kick it up a notch! Navigate back to your home folder before continuing.
Ditto
A hidden gem in OS X is Apple’s ditto command. I’ve
found this incredibly useful in copying large amounts of data as it can
run within a Terminal window that contains more useful information about
its progress than the more traditional Finder copy window.
1
$ ditto -V /old/work/ /new/work/
The above command will copy our “work” folder to a new location. Actually, what happens is the command copies the contents of our “work” folder to a new “work” folder.
Adding -V, meaning verbose prints a line to
the Terminal window for every file that’s being copied. It’s extremely
useful as you can see exactly what file is being copied at any time.
Ditto is a command I use frequently and have often copied many
gigabytes of data between hard drives using it because it seems to be so
reliable.
Disable Screenshot Drop Shadows
If we ever take a screenshot of a window in OS X, by default it will
always show a drop shadow, adding wasted pixels. If you’d prefer to have
your screenshots drop shadow-free, you can use the following command:
You can either restart your Mac to see the changes or, using another command, see them instantly:
1
$ killall SystemUIServer
This command stops the graphical front-end to OS X for a split second. Don’t worry, it has
to run all the time so as soon as it is stopped, it restarts instantly -
but updated with our new option. Take a screenshot and you’ll now
notice that the shadow is no longer included.
To reverse the changes, you can enter the following command:
PNG is probably the best format to use for screenshots, but it can
certainly take up a bit of space. If you’d prefer to use PDF format, you
can use the following:
1
$ defaults write com.apple.screencapture type PDF
1
$ killall SystemUIServer
To revert the changes, enter the following:
1
$ defaults write com.apple.screencapture type png
1
$ killall SystemUIServer
Change Screenshot Location
Whilst taking screenshots is great, it can quickly clutter up the Desktop. To change this, we can use:
Rather then deal with pesky long path names, you can just type the
first part of the command and, after the word “location”, drag a folder
you’d like your screenshots to save to. To undo the changes, you can
use:
Tip: The squiggle, ~, actually represents your home folder. In the
example above, this would actually mean /Users/jordan/Desktop. A useful
timesaver!
Enable AirDrop on Older Macs
AirDrop is a great feature to send files between Macs quickly and
easily without dealing with pesky file sharing apps. Trouble is, it’s
only on WiFi and on more recent Macs.
If your Mac doesn’t currently support AirDrop, you can enter the
following command to use it, as well as to use it over ethernet:
Once the Finder restarts, you’ll see a lot of files you never saw
before, usually starting with a period (which denotes a hidden file in
OS X).
To revert the changes:
If you’re wanting to run some stress tests on your Mac, there’s a
simple command we can enter that will instantly utilise 100% of your
CPU:
1
$ yes
Apple technicians use this frequently when dealing with troublesome
Macs that might be crashing under load and it’s a very quick way of
stressing a Mac. To cancel the command, press Ctrl-C.
View File System Usage
Sometimes we want to see what our Mac is doing when it comes to
reading and writing to disk, especially if we’re trying to identify
something that’s preventing us from ejecting a drive. To do this, we
use:
1
$ sudo fs_usage
By entering sudo, we are requesting to run this as a
super user, which requires entering our Mac’s login password. Once
done, you’re presented with a constant stream of information as
processes are accessing your disk.
Some processes you are likely to see are Time Machine (backupd) and Spotlight (mds).
To cancel, you can press Ctrl-C.
View the Contents of Any File
Sometimes we have a file and we just don’t know what format it is. If
it’s likely to be a text format, we can attempt to open it in TextEdit, but it doesn’t always work. We can investigate any file from the Terminal by using:
1
$ cat /path/to/file
No matter what the file is, this will open it. On files like MP3s or
videos, it’ll likely be gibberish. But if you’re trying to recover a
corrupt document, this might help.
Rebuild Spotlight
Spotlight can occasionally not work as well as we’d like. Sometimes,
we just need to tell Spotlight to create a new index so it can find
files as fast and efficiently as possible. To do this:
1
$ sudo mdutil -E /Volumes/DriveName
The above command will delete Spotlight’s index, forcing it to start a
new one. An easier way of completing the command is to enter the first
part of it and, for the location, just drag a hard drive from your
desktop to the Terminal window.
Remove Duplicate “Open With…” Entries
A common bug in OS X is seeing duplicate apps within the “Open With…” menu which can get quite full! To fix it:
1
$

/System/Library/Frameworks/CoreServices.framework/Frameworks/LaunchServices.framework/Support/lsregister
 -kill -r -domain local -domain system -domain user
The above command will work in OS X Leopard and above. Unlike the other commands, I’d recommend restarting your Mac.
Enable Text Selection in Quick Look
Quick Look is great but wouldn’t it be even better if we could select
text from within Quick Look without having to open the document? Well
with this command, you can:
You can open documents directly from the Terminal very easily, but
what about opening them in another application that isn’t the default
one for its file type?
1
$ open -a /Applications/AppName.app /path/to/file.txt
Doing the above will open our text file in the app AppName. Simply change the app and file to whatever you need.
Check the Uptime Of Your Mac
It can be days, weeks or even months before we reboot our Mac and it
can sometimes be so long that we can’t even remember when we last did.
To see how long our Mac has gone without a restart, we can use:
1
$ uptime
This will display the current time and how long our Mac has been running.
Install OS X Software Updates
Despite Software Updates moving to the App Store in
Mountain Lion, we’re able to use the command line to install system
udates without having to launch it. To see available software updates
for your Mac:
1
$ sudo softwareupdate -l
After a few minutes, you’ll be given a list of available updates.
If you’d like to install all available updates, enter:
1
$ sudo softwareupdate -ia
Display A Custom Message At The Login Window
When using a multi-user Mac, it’s often good to have a message display to provide some useful information, such as “Hey, sticky hands! Others have to use this keyboard, y’know.”
If you’re needing to quickly test some HTML that you’re working on, start a simple web server within any folder on your Mac. Navigate to the folder to use and enter:
1
$ python -m SimpleHTTPServer 8000
The number at the end is the port to use, open your browser and visit http://localhost:8000 You can use the default of port 80 if you wish and remove the port number entirely.
When you’re finished, simply press Ctrl-C.
Run the Same Command Again
You will have seen a few of these commands have required us to enter sudo first, to run them as the root super user. Sometimes, we can enter a long command, only to find out we forgot to put sudo
first. Thankfully, we don’t need to re-write the entire command again
(or copy and paste). Instead, we can use a very simple shortcut that
stands in place of your previously written command:
1
$ !!
If we needed to enter the same command again but with sudo in front, we can just type:
1
$ sudo !!
Download a File Without a Browser
If you’d like to download a file without using a browser, we can use the following command:
This will download any URL you enter to the folder you’re currently
in. Some browsers try to automatically open files when they’re
downloaded or add a pesky file extension when you don’t want them
(especially when dealing with text files that have something else
besides the .txt extension).
Shutdown Your Mac, With or Without a Delay
To shut down your Mac immediately:
1
$ sudo shutdown -h now
To restart your Mac immediately:
1
$ sudo shutdown -r now
We can even add a time delay (in minutes) if we wish:
1
$ sudo shutdown -r +60
Whilst this might not be very useful on your own Mac, if you spend
any time remotely logged in to Macs via the command line, these can
become very useful at restarting remote servers.
Disable Mail’s Reply Animation in Mountain Lion
Mail has a great looking animation whereby if you hit reply to any
message, a compose window animates into view. It’s not for everyone and
sometimes just having the window appear instantly. To turn off the
animation:
We’ve all left our Mac doing something that will take some time to
do, only to come back and find it went to sleep. We can prevent this
from happening by using a simple, and humorously named, command:
1
$ caffeinate
Entering the command on its own will keep the Mac awake until you stop it by pressing Ctrl-C. You can add a time parameter with:
1
$ caffeinate -u -t 600
The number represents the number of seconds, so our command above
will stop the Mac from going to sleep in the next ten minutes.
Create a File Of Any Size
There are occasions when we just need to a file of a particular size
for testing. I often find it useful to copy a 1GB file over a network to
get an idea of speeds. Finding a file that is the size we want is
tricky, but with the command line we can create an empty file of any
size that we want.
1
$ mkfile 1g test.abc
You can specify the file size in bytes (b), kilobytes (k), megabytes
(m) or gigabytes (g). The above example creates a test file of 1GB
called test.abc but you can name it whatever you wish and it doesn’t need to have a file extension.
Continually Monitor the Output of a File
This one is for all the budding system administrators out there. If
you’d like to keep monitoring a text file and view any changes to it as
they’re made, there’s a suitable command that will constantly monitor
your chosen file and display any new lines as they’re added, perfect for
monitoring system log files.
1
$ tail -f /var/log/system.log
Your Terminal window will constantly watch your specified file (in this case, the system.log and every time another line is added, it will print it on the screen.
To cancel, press Ctrl-C.
Get Your Network IP Address
Sure, we could open System Preferences, select Network and then view our IP address information, but doing it through the command line is so much cooler!
1
$ ipconfig getifaddr en0
The term en0 represents the network interface to
use. Similar to some programming languages, the first network interface
starts at zero and then counts up, so if you have two interfaces (such
as ethernet and WiFi) then they would be en0 and en1, respectively.
By default, your Mac will always designate a wired network connection as en0, unless your Mac doesn’t have built-in ethernet. You can substitute en0 with en1 if you’re not using your wired connection.
Get Your External IP Address
The most common way of finding out your public IP address (the one that we’re provided by our ISP) by visiting a site such as What Is My IP or even typing “what is my IP address” into Google.
We can actually use the Terminal to discover our public IP address using a similar service as above called IP Echo.
1
$ curl ipecho.net/plain; echo
As soon as you run the command, you’re presented with your external
IP address. Whilst it might not be as quick to type as visiting one of
the aforementioned sites, we can do a lot with the Terminal output,
especially if we’re wanting to include it in some sort of script.
Test Network Connectivity
You’re likely to have heard of the term “ping” at some point. Ping
sends very small bits of information over a network to a remote
computer, timing how long it takes for a response to be received. It’s
useful to see if an IP address is working or if a website might be down.
1
$ ping -c 10 www.apple.com
Running the above command will send 10 packets of information and
provide detailed information about the response time. You can substitute
www.apple.com for any other domain name or IP address.
Disable Google Chrome’s Two-Finger Swipe Navigation
For Macs with a built-in multitouch trackpad or used with the Magic
Trackpad, Google Chrome offers its own version of two-finger swiping to
go forward and back. Whilst it’s easy to change this behaviour in
Safari, doing so in Google Chrome requires a little Terminal trickery:
iCloud is a great service but if you prefer to use Dropbox, or just
save files to your Mac, then you’ll no doubt have been frustrated that
many iCloud-compatible apps offer iCloud as the default Save… destination. Thankfully, we can change this:
Quit and relaunch any app that uses iCloud and now any new documents
will default to your Mac in the save dialog rather than iCloud.
To revert the changes:
Make the Icon of Any Hidden App in the Dock Translucent
Hiding apps when you’re not using them is a great way to free up
screen space but there’s not really any way to distinguish between which
app is hidden and which isn’t. We can alter the Dock so any apps that
are hidden will have a translucent icon:
It can be very tedious to enter it all out. What we can do instead is use the Tab
key to autocomplete. To use it, simply start entering any command where
you’re needing to type a path and once you’ve entered the first or
second letter, press Tab. If there’s only one folder that the first few characters could autocomplete to, it will do so. If not, you can press Tab twice and it will jump as far as it can, then display all potential files and folders you might want to get to.
To try this, enter the following but instead of pressing Enter, press Tab instead:
1
$ cd /Us
You’ll find it then autocompletes to:
1
$ cd /User
You’ll likely hear an alert tone as well. That’s because there’s two folders you might want access to: /Users and /User Information. You can then add the last character to the path and press Enter.
It works very similar to autocomplete of words in iOS.
Make Your Mac Talk
Mac OS X has some great speech functionality built-in and we can even have it say anything we want:
1
$ say "This Mac runs OS X, not OS ex"
We can even go one better and have it read any text file we like:
1
$say -f /path/to/file.txt
Our Mac can then say whatever was in the text file.
Restore a Disk Image to an External Drive
You can mimic the behaviour of Disk Utility and restore a disk image file to an volume connected to your Mac:
1
$ sudo asr -restore -noverify -source /path/to/diskimage/dmg -target /Volumes/VolumeToRestoreTo
It will skip verification (you can remove that part if you want to
verify it but it can take some time) and you can restore an image, such
as a copy of OS X, directly to a volume or partition.
Turn Off Dashboard
Dashboard was once the future of quick-to-access apps such
as a calculator and sticky notes. Despite being quite popular for a few
years, it’s quickly faded into obscurity. It’s still around and usually
opened accidentally.
I use Mission Control extensively and have it positioned on the far left but, honestly, I prefer it gone completely. Thankfully, Dashboard can be permanently silenced:
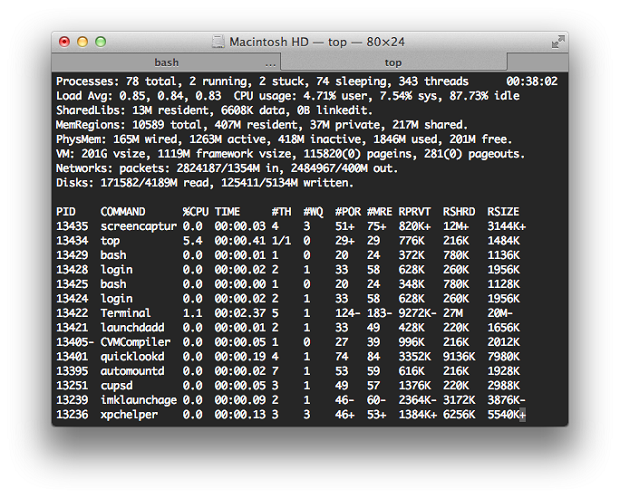
The app Activity Monitor can give us a detailed view of what our Mac is currently doing. We can replicate much of its functionality in Terminal:
1
$ top
Once running, we can easily see all the current processes, listed by
processor usage with the processes using the most CPU moving to the top
of the list.
Additionally, there’s plenty of other information at the top of the
window, from how many processes are running, how much RAM is currently
in use to the amount of network traffic we have generated.
See A List of All The Commands You’ve Entered
For our final one, we can enter a command to view all the commands we’ve entered at the command line:
1
$ history
All of the previous commands that you’ve run within Terminal are
listed here, giving you the ability to go back and see what you’ve
already done.
Conclusion
The Terminal can help you configure your Mac exactly how you want it
and provide access to features that just don't have any graphical
interface to change. There are many options that are perfectly safe to
use but to avoid overwhelming the user, they're hidden away, only to be
found by power users wanting to make the change.
The command line is a very powerful tool and, just as Uncle Ben said to Peter Parker, "With great power comes great responsibility". Use it wisely!
alias Create an alias •
alloc List used and free memory
apropos Search the whatis database for strings
asr Apple Software Restore
awk Find and Replace text within file(s)
b
basename Convert a full pathname to just a filename
bash Bourne-Again SHell
bg Send to background •
bind Display readline key and function bindings •
bless Set volume bootability and startup disk options
break Exit from a For, While, Until or Select loop •
builtin Execute a shell builtin •
bzip2 Compress or decompress files
c
cal Display a calendar
calendar Reminder Service
caller Return the context of a subroutine call •
case Conditionally perform a command •
cat Concatenate and print (display) the content of files
cd Change Directory •
chflags Change a file or folder's flags
chgrp Change group ownership
chmod Change access permissions
chown Change file owner and group
chroot Run a command with a different root directory
cksum Print CRC checksum and byte counts
clear Clear terminal screen
cmp Compare two files
comm Compare two sorted files line by line
command Run a command (not a function) •
complete Edit a command completion [word/pattern/list] •
continue Resume the next iteration of a loop •
cp Copy one or more files to another location
cron Daemon to execute scheduled commands
crontab Schedule a command to run at a later date/time
csplit Split a file into context-determined pieces
curl Transfer data from or to a server
cut Divide a file into several parts
d
date Display or change the date & time
dc Desk Calculator
dd Convert and copy a file, clone disks
declare Declare variable & set attributes •
defaults Set preferences, show hidden files
df Display free disk space
diff Display the differences between two files
diff3 Show differences among three files
dig DNS lookup
dirname Convert a full pathname to just a path
dirs Display list of remembered directories •
diskutil Disk utilities - Format, Verify, Repair
disown Unbind a job from the current login session •
ditto Copy files and folders
dot_clean Remove dot-underscore files
drutil Interact with CD/DVD burners
dscacheutil Query or flush the Directory Service/DNS cache
dseditgroup Edit, create, manipulate, or delete groups
dsenableroot Enable root access
dsmemberutil View user and groups rights
dscl Directory Service command line utility
du Estimate file space usage
e
echo Display text on screen •
ed A line-oriented text editor (edlin)
enable Enable and disable builtin shell commands •
env List or Set environment variables
eval Evaluate several commands/arguments •
exec Execute a command •
exit Exit the shell •
expand Convert tabs to spaces
expect Programmed dialogue with interactive programs
Also see AppleScriptexport Set an environment variable •
expr Evaluate expressions
f
false Do nothing, unsuccessfully
fc Fix command (history)
fdisk Partition table manipulator for Darwin UFS/HFS/DOS
fg Send job to foreground •
file Determine file type
find Search for files that meet a desired criteria
fmt Reformat paragraph text
fold Wrap text to fit a specified width
for Loop command •
fsck Filesystem consistency check and repair
fsaclctl Filesystem enable/disable ACL support
fs_usage Filesystem usage (process/pathname)
ftp Internet file transfer program
function Define Function Macros
g
GetFileInfo Get attributes of HFS+ files
getopt Parse positional parameters
getopts Parse positional parameters •
goto Jump to label and continue execution
grep Search file(s) for lines that match a given pattern
groups Print group names a user is in
gzip Compress or decompress files
h
halt Stop and restart the operating system
hash Refresh the cached/remembered location of commands •
head Display the first lines of a file
hdiutil Manipulate iso disk images
history Command History •
hostname Print or set system name
i
iconv Convert the character set of a file
id Print user and group names/id's
if Conditionally perform a command •
ifconfig Configure network interface parameters
ipconfig View and control IP configuration state
info Help info
install Copy files and set attributes
j
jobs List active jobs •
join Join lines on a common field
k
kextfind List kernel extensions
kickstart Configure Apple Remote Desktop
kill Stop a process from running
l
l List files in long format (ls -l)
last Indicate last logins of users and ttys
launchctl Load or unload daemons/agents
ll List files in long format, showing invisible files (ls -la)
less Display output one screen at a time
let Evaluate expression •
lipo Convert a universal binary
ln Make links between files (hard links, symbolic links)
local Set a local (function) variable •
locate Find files
logname Print current login name
login log into the computer
logout Exit a login shell (bye) •
look Display lines beginning with a given string
lpr Print files
lprm Remove jobs from the print queue
lpstat Printer status information
ls List information about file(s)
lsregister Reset the Launch Services database
lsbom List a bill of materials file
lsof List open files
m
man Help manual
mdfind Spotlight search
mdutil Manage Spotlight metadata store
mkdir Create new folder(s)
mkfifo Make FIFOs (named pipes)
more Display output one screen at a time
mount Mount a file system
mv Move or rename files or directories
n
nano Simple text editor
net Manage network resources
netstat Show network status
networksetup Network and System Preferences
nice Set the priority of a command
nohup Run a command immune to hangups
ntfs.util NTFS file system utility
o
onintr Control the action of a shell interrupt
open Open a file/folder/URL/Application
opensnoop Snoop file opens as they occur
osacompile Compile Applescript
osascript Execute AppleScript
p
passwd Modify a user password
paste Merge lines of files
pbcopy Copy data to the clipboard
pbpaste Paste data from the Clipboard
ping Test a network connection
pkgutil Query and manipulate installed packages
plutil Property list utility
pmset Power Management settings
popd Restore the previous value of the current directory •
pr Convert text files for printing
printenv List environment variables
printf Format and print data •
ps Process status
pushd Save and then change the current directory
pwd Print Working Directory •
q
quota Display disk usage and limits
r
rcp Copy files between machines
read Read one line from standard input •
readonly Mark a variable or function as read-only •
reboot Stop and restart the system
return Exit a function •
rev Reverse lines of a file
rm Remove files
rmdir Remove folder(s)
rpm Remote Package Manager
rsync Remote file copy - Sync file tree (also RsyncX)
s
say Convert text to audible speech
screen Multiplex terminal, run remote shells via ssh
screencapture Capture screen image to file or disk
scutil Manage system configuration parameters
sdiff Merge two files interactively
security Administer Keychains, keys, certificates and the Security framework
sed Stream Editor
select Generate a list of items •
set Set a shell variable = value •
setfile Set attributes of HFS+ files
shasum Print or Check SHA Checksums
shift Shift positional parameters •
shopt Set shell options •
shutdown Shutdown or restart OS X
sips Scriptable image processing system
sleep Delay for a specified time
softwareupdate System software update tool
sort Sort text files
source Execute commands from a file •
split Split a file into fixed-size pieces
stat Display the status of a file
stop Stop a job or process
su Substitute user identity
sudo Execute a command as another user
sum Print a checksum for a file
suspend Suspend execution of this shell •
sw_vers Print Mac OS X operating system version
system_profiler Report system configuration
systemsetup Computer and display system settings
t
tail Output the last part of files
tar Tape ARchiver
tcpdump Dump traffic on a network
tee Redirect output to multiple files
test Condition evaluation •
textutil Manipulate text files in various formats (Doc,html,rtf)
time Measure Program Resource Use
times Print shell & shell process times •
tmutil Time Machine utility
top Display process information
touch Change file timestamps
tr Translate, squeeze, and/or delete characters
trap Execute a command when the shell receives a signal •
traceroute Trace Route to Host
true Do nothing, successfully
tty Print filename of terminal on stdin
type Describe a command •
u
ufs.util Mount/unmount UFS file system
ulimit limit the use of system-wide resources •
umask Users file creation mask
umount Unmount a device
unalias Remove an alias •
uname Print system information
unexpand Convert spaces to tabs
uniq Uniquify files
units Convert units from one scale to another
unset Remove variable or function names •
until Loop command •
uptime Show how long system has been running
users Print login names of users currently logged in
uuencode Encode a binary file
uudecode Decode a file created by uuencode
uuidgen Generate a Unique ID (UUID/GUID)
uucp Unix to Unix copy
v
vi Text Editor
w
wait Wait for a process to complete •
wc Print byte, word, and line counts
whatis Search the whatis database for complete words
whereis Locate a program
which Locate a program file in the user's path
while Loop command •
who Print all usernames currently logged on
whoami Print the current user id and name (`id -un')
write Send a message to another user
x
xargs Execute utility - passing arguments
xattr Display and manipulate extended attributes
yes Print a string until interrupted
zip Package and compress (archive) files.
!! Run the last command again
Commands marked • are bash built-in commands.
bash is the default shell, it runs under, The open source core of OS X.