The Terminal is an exceptionally powerful tool, providing a command
line interface to the underpinnings of OS X. It’s a topic we’ve covered
at length before with our popular series Taming the Terminal.
There’s a great deal that Terminal can do, from moving large numbers
of files to changing preferences that we didn’t even know exist. To
demonstrate just how versatile the Terminal is, I’ve rounded up 40 truly
excellent Terminal tips and tricks that can come in very handy.
Before We Begin
All of the Terminal commands I’ll be showing you are perfectly safe
to use and, when it comes to changing preferences, are completely
reversible. Saying that, the Terminal is a fickle creature and leaves no
margin for error so make sure you’re entering the commands exactly as
they are written here.
As always, make sure you have a recent backup in case something does happen.
Tip: If you’re unfamiliar with Terminal, I would strongly encourage you to read our introductory series on the topic, Taming the Terminal. Terminal isn’t for the faint of heart and we’d rather you be comfortable entering some of these commands.
Entering Terminal
The Terminal window
Terminal is located in the Applications > Utilities folder. Once opened, you can then start entering commands.
Within Terminal, you’ll see something like this:
1
MacBook:~ jordan$
This is the prompt, where we enter our commands. To correctly identify how to enter a command, I will be using a dollar sign ($) to signify the prompt, so simply enter the command that follows a dollar sign.
Let’s warm up with some basic commands!
Clear the Window
1
$ clear
Simply put, this clears the current window. (Within Terminal in OS X,
you can still scroll up to see what was there. This command simply
clears the current view).
Navigating to Folders
You can navigate to a folder, such as Utilities, by typing the following command:
1
$ cd /Applications/Utilities
If you want to quickly jump back to your home folder, you can simply enter:
1
$ cd
With folders that contain spaces, there’s two ways you can do it:
1
2
$ cd /Volumes/Macintosh\ HD/
$ cd "/Volumes/Macintosh HD/"
The first method uses the \ back slash to “escape” the space. Since
the command line treats spaces as part of commands, the \ character
tells Terminal to ignore the space that immediately follows.
Alternatively, you can simply wrap the folder’s path in quotation marks
and any spaces it contains will be ignored. Navigate back to your home folder before continuing.
List the Contents of a Directory
You can view the contents of a folder by entering:
1
$ ls
The default output of 'ls'
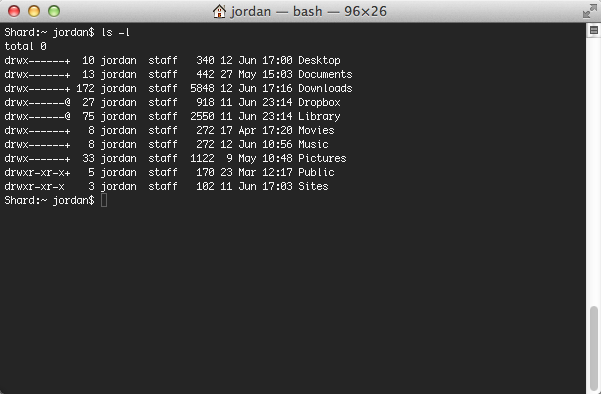
To view it in a list format, enter:
1
$ ls -l
The output of 'ls' with the '-l' flag
If you want to view all files, including hidden ones:
1
$ ls -a
The above command will display all files, including those hidden ones
that start with a period. What if we want to view the folder as a list
but also view all the hidden files?
1
$ ls -la
Yep, it’s as simple as combining them together! I think you’re suitably warmed up, so let’s kick it up a notch! Navigate back to your home folder before continuing.
Ditto
A hidden gem in OS X is Apple’s ditto command. I’ve
found this incredibly useful in copying large amounts of data as it can
run within a Terminal window that contains more useful information about
its progress than the more traditional Finder copy window.
1
$ ditto -V /old/work/ /new/work/
The above command will copy our “work” folder to a new location. Actually, what happens is the command copies the contents of our “work” folder to a new “work” folder.
Adding -V, meaning verbose prints a line to
the Terminal window for every file that’s being copied. It’s extremely
useful as you can see exactly what file is being copied at any time.
Ditto is a command I use frequently and have often copied many
gigabytes of data between hard drives using it because it seems to be so
reliable.
Disable Screenshot Drop Shadows
If we ever take a screenshot of a window in OS X, by default it will
always show a drop shadow, adding wasted pixels. If you’d prefer to have
your screenshots drop shadow-free, you can use the following command:
You can either restart your Mac to see the changes or, using another command, see them instantly:
1
$ killall SystemUIServer
This command stops the graphical front-end to OS X for a split second. Don’t worry, it has
to run all the time so as soon as it is stopped, it restarts instantly -
but updated with our new option. Take a screenshot and you’ll now
notice that the shadow is no longer included.
To reverse the changes, you can enter the following command:
PNG is probably the best format to use for screenshots, but it can
certainly take up a bit of space. If you’d prefer to use PDF format, you
can use the following:
1
$ defaults write com.apple.screencapture type PDF
1
$ killall SystemUIServer
To revert the changes, enter the following:
1
$ defaults write com.apple.screencapture type png
1
$ killall SystemUIServer
Change Screenshot Location
Whilst taking screenshots is great, it can quickly clutter up the Desktop. To change this, we can use:
Rather then deal with pesky long path names, you can just type the
first part of the command and, after the word “location”, drag a folder
you’d like your screenshots to save to. To undo the changes, you can
use:
Tip: The squiggle, ~, actually represents your home folder. In the
example above, this would actually mean /Users/jordan/Desktop. A useful
timesaver!
Enable AirDrop on Older Macs
AirDrop is a great feature to send files between Macs quickly and
easily without dealing with pesky file sharing apps. Trouble is, it’s
only on WiFi and on more recent Macs.
If your Mac doesn’t currently support AirDrop, you can enter the
following command to use it, as well as to use it over ethernet:
Once the Finder restarts, you’ll see a lot of files you never saw
before, usually starting with a period (which denotes a hidden file in
OS X).
To revert the changes:
If you’re wanting to run some stress tests on your Mac, there’s a
simple command we can enter that will instantly utilise 100% of your
CPU:
1
$ yes
Apple technicians use this frequently when dealing with troublesome
Macs that might be crashing under load and it’s a very quick way of
stressing a Mac. To cancel the command, press Ctrl-C.
View File System Usage
Sometimes we want to see what our Mac is doing when it comes to
reading and writing to disk, especially if we’re trying to identify
something that’s preventing us from ejecting a drive. To do this, we
use:
1
$ sudo fs_usage
By entering sudo, we are requesting to run this as a
super user, which requires entering our Mac’s login password. Once
done, you’re presented with a constant stream of information as
processes are accessing your disk.
Some processes you are likely to see are Time Machine (backupd) and Spotlight (mds).
To cancel, you can press Ctrl-C.
View the Contents of Any File
Sometimes we have a file and we just don’t know what format it is. If
it’s likely to be a text format, we can attempt to open it in TextEdit, but it doesn’t always work. We can investigate any file from the Terminal by using:
1
$ cat /path/to/file
No matter what the file is, this will open it. On files like MP3s or
videos, it’ll likely be gibberish. But if you’re trying to recover a
corrupt document, this might help.
Rebuild Spotlight
Spotlight can occasionally not work as well as we’d like. Sometimes,
we just need to tell Spotlight to create a new index so it can find
files as fast and efficiently as possible. To do this:
1
$ sudo mdutil -E /Volumes/DriveName
The above command will delete Spotlight’s index, forcing it to start a
new one. An easier way of completing the command is to enter the first
part of it and, for the location, just drag a hard drive from your
desktop to the Terminal window.
Remove Duplicate “Open With…” Entries
A common bug in OS X is seeing duplicate apps within the “Open With…” menu which can get quite full! To fix it:
1
$

/System/Library/Frameworks/CoreServices.framework/Frameworks/LaunchServices.framework/Support/lsregister
 -kill -r -domain local -domain system -domain user
The above command will work in OS X Leopard and above. Unlike the other commands, I’d recommend restarting your Mac.
Enable Text Selection in Quick Look
Quick Look is great but wouldn’t it be even better if we could select
text from within Quick Look without having to open the document? Well
with this command, you can:
You can open documents directly from the Terminal very easily, but
what about opening them in another application that isn’t the default
one for its file type?
1
$ open -a /Applications/AppName.app /path/to/file.txt
Doing the above will open our text file in the app AppName. Simply change the app and file to whatever you need.
Check the Uptime Of Your Mac
It can be days, weeks or even months before we reboot our Mac and it
can sometimes be so long that we can’t even remember when we last did.
To see how long our Mac has gone without a restart, we can use:
1
$ uptime
This will display the current time and how long our Mac has been running.
Install OS X Software Updates
Despite Software Updates moving to the App Store in
Mountain Lion, we’re able to use the command line to install system
udates without having to launch it. To see available software updates
for your Mac:
1
$ sudo softwareupdate -l
After a few minutes, you’ll be given a list of available updates.
If you’d like to install all available updates, enter:
1
$ sudo softwareupdate -ia
Display A Custom Message At The Login Window
When using a multi-user Mac, it’s often good to have a message display to provide some useful information, such as “Hey, sticky hands! Others have to use this keyboard, y’know.”
If you’re needing to quickly test some HTML that you’re working on, start a simple web server within any folder on your Mac. Navigate to the folder to use and enter:
1
$ python -m SimpleHTTPServer 8000
The number at the end is the port to use, open your browser and visit http://localhost:8000 You can use the default of port 80 if you wish and remove the port number entirely.
When you’re finished, simply press Ctrl-C.
Run the Same Command Again
You will have seen a few of these commands have required us to enter sudo first, to run them as the root super user. Sometimes, we can enter a long command, only to find out we forgot to put sudo
first. Thankfully, we don’t need to re-write the entire command again
(or copy and paste). Instead, we can use a very simple shortcut that
stands in place of your previously written command:
1
$ !!
If we needed to enter the same command again but with sudo in front, we can just type:
1
$ sudo !!
Download a File Without a Browser
If you’d like to download a file without using a browser, we can use the following command:
This will download any URL you enter to the folder you’re currently
in. Some browsers try to automatically open files when they’re
downloaded or add a pesky file extension when you don’t want them
(especially when dealing with text files that have something else
besides the .txt extension).
Shutdown Your Mac, With or Without a Delay
To shut down your Mac immediately:
1
$ sudo shutdown -h now
To restart your Mac immediately:
1
$ sudo shutdown -r now
We can even add a time delay (in minutes) if we wish:
1
$ sudo shutdown -r +60
Whilst this might not be very useful on your own Mac, if you spend
any time remotely logged in to Macs via the command line, these can
become very useful at restarting remote servers.
Disable Mail’s Reply Animation in Mountain Lion
Mail has a great looking animation whereby if you hit reply to any
message, a compose window animates into view. It’s not for everyone and
sometimes just having the window appear instantly. To turn off the
animation:
We’ve all left our Mac doing something that will take some time to
do, only to come back and find it went to sleep. We can prevent this
from happening by using a simple, and humorously named, command:
1
$ caffeinate
Entering the command on its own will keep the Mac awake until you stop it by pressing Ctrl-C. You can add a time parameter with:
1
$ caffeinate -u -t 600
The number represents the number of seconds, so our command above
will stop the Mac from going to sleep in the next ten minutes.
Create a File Of Any Size
There are occasions when we just need to a file of a particular size
for testing. I often find it useful to copy a 1GB file over a network to
get an idea of speeds. Finding a file that is the size we want is
tricky, but with the command line we can create an empty file of any
size that we want.
1
$ mkfile 1g test.abc
You can specify the file size in bytes (b), kilobytes (k), megabytes
(m) or gigabytes (g). The above example creates a test file of 1GB
called test.abc but you can name it whatever you wish and it doesn’t need to have a file extension.
Continually Monitor the Output of a File
This one is for all the budding system administrators out there. If
you’d like to keep monitoring a text file and view any changes to it as
they’re made, there’s a suitable command that will constantly monitor
your chosen file and display any new lines as they’re added, perfect for
monitoring system log files.
1
$ tail -f /var/log/system.log
Your Terminal window will constantly watch your specified file (in this case, the system.log and every time another line is added, it will print it on the screen.
To cancel, press Ctrl-C.
Get Your Network IP Address
Sure, we could open System Preferences, select Network and then view our IP address information, but doing it through the command line is so much cooler!
1
$ ipconfig getifaddr en0
The term en0 represents the network interface to
use. Similar to some programming languages, the first network interface
starts at zero and then counts up, so if you have two interfaces (such
as ethernet and WiFi) then they would be en0 and en1, respectively.
By default, your Mac will always designate a wired network connection as en0, unless your Mac doesn’t have built-in ethernet. You can substitute en0 with en1 if you’re not using your wired connection.
Get Your External IP Address
The most common way of finding out your public IP address (the one that we’re provided by our ISP) by visiting a site such as What Is My IP or even typing “what is my IP address” into Google.
We can actually use the Terminal to discover our public IP address using a similar service as above called IP Echo.
1
$ curl ipecho.net/plain; echo
As soon as you run the command, you’re presented with your external
IP address. Whilst it might not be as quick to type as visiting one of
the aforementioned sites, we can do a lot with the Terminal output,
especially if we’re wanting to include it in some sort of script.
Test Network Connectivity
You’re likely to have heard of the term “ping” at some point. Ping
sends very small bits of information over a network to a remote
computer, timing how long it takes for a response to be received. It’s
useful to see if an IP address is working or if a website might be down.
1
$ ping -c 10 www.apple.com
Running the above command will send 10 packets of information and
provide detailed information about the response time. You can substitute
www.apple.com for any other domain name or IP address.
Disable Google Chrome’s Two-Finger Swipe Navigation
For Macs with a built-in multitouch trackpad or used with the Magic
Trackpad, Google Chrome offers its own version of two-finger swiping to
go forward and back. Whilst it’s easy to change this behaviour in
Safari, doing so in Google Chrome requires a little Terminal trickery:
iCloud is a great service but if you prefer to use Dropbox, or just
save files to your Mac, then you’ll no doubt have been frustrated that
many iCloud-compatible apps offer iCloud as the default Save… destination. Thankfully, we can change this:
Quit and relaunch any app that uses iCloud and now any new documents
will default to your Mac in the save dialog rather than iCloud.
To revert the changes:
Make the Icon of Any Hidden App in the Dock Translucent
Hiding apps when you’re not using them is a great way to free up
screen space but there’s not really any way to distinguish between which
app is hidden and which isn’t. We can alter the Dock so any apps that
are hidden will have a translucent icon:
It can be very tedious to enter it all out. What we can do instead is use the Tab
key to autocomplete. To use it, simply start entering any command where
you’re needing to type a path and once you’ve entered the first or
second letter, press Tab. If there’s only one folder that the first few characters could autocomplete to, it will do so. If not, you can press Tab twice and it will jump as far as it can, then display all potential files and folders you might want to get to.
To try this, enter the following but instead of pressing Enter, press Tab instead:
1
$ cd /Us
You’ll find it then autocompletes to:
1
$ cd /User
You’ll likely hear an alert tone as well. That’s because there’s two folders you might want access to: /Users and /User Information. You can then add the last character to the path and press Enter.
It works very similar to autocomplete of words in iOS.
Make Your Mac Talk
Mac OS X has some great speech functionality built-in and we can even have it say anything we want:
1
$ say "This Mac runs OS X, not OS ex"
We can even go one better and have it read any text file we like:
1
$say -f /path/to/file.txt
Our Mac can then say whatever was in the text file.
Restore a Disk Image to an External Drive
You can mimic the behaviour of Disk Utility and restore a disk image file to an volume connected to your Mac:
1
$ sudo asr -restore -noverify -source /path/to/diskimage/dmg -target /Volumes/VolumeToRestoreTo
It will skip verification (you can remove that part if you want to
verify it but it can take some time) and you can restore an image, such
as a copy of OS X, directly to a volume or partition.
Turn Off Dashboard
Dashboard was once the future of quick-to-access apps such
as a calculator and sticky notes. Despite being quite popular for a few
years, it’s quickly faded into obscurity. It’s still around and usually
opened accidentally.
I use Mission Control extensively and have it positioned on the far left but, honestly, I prefer it gone completely. Thankfully, Dashboard can be permanently silenced:
The app Activity Monitor can give us a detailed view of what our Mac is currently doing. We can replicate much of its functionality in Terminal:
1
$ top
Once running, we can easily see all the current processes, listed by
processor usage with the processes using the most CPU moving to the top
of the list.
Additionally, there’s plenty of other information at the top of the
window, from how many processes are running, how much RAM is currently
in use to the amount of network traffic we have generated.
See A List of All The Commands You’ve Entered
For our final one, we can enter a command to view all the commands we’ve entered at the command line:
1
$ history
All of the previous commands that you’ve run within Terminal are
listed here, giving you the ability to go back and see what you’ve
already done.
Conclusion
The Terminal can help you configure your Mac exactly how you want it
and provide access to features that just don't have any graphical
interface to change. There are many options that are perfectly safe to
use but to avoid overwhelming the user, they're hidden away, only to be
found by power users wanting to make the change.
The command line is a very powerful tool and, just as Uncle Ben said to Peter Parker, "With great power comes great responsibility". Use it wisely!


0 comments:
Post a Comment