OS X Mavericks is the 10th release of the OS X. Mac OS X Mavericks
was released worldwide in October 2013. This update has a great
stress on the life of the battery and improvements have been made for
the power users. The operating system is available free of cost and some
new addition have been made in this version like maps and iBooks are
now available on your desktop. Tabbed windows has been introduced by
which now you can swipe between different windows easily.
The applications included in Mac OS X Mavericks are awesome and great
in their use like FaceTime by which you can make video calls and can
contact your loved ones easily and can chat with them face to face. Game
Center is also included in this version by which you can play games
with your friends online. Then there is a comprehensive music studio
called GarageBand by which you can create music of your own and then can
share it to the world. As mentioned above iBooks are now also available
on your desktop and you can easily read any book of your choice from
iBook store.You can also Download Mac OS X Yosemite for Latest features.
iMovie is another application included in Mac OS X Mavericks which
can be used for creating movies and editing the existing videos. iPhoto
is another application which is included in this version and you can
organize and view your photos. KeyNote is an application by which you
can create beautiful and impressive presentations. These apps mentioned
above plus many more makes Mac OS X Mavericks a very handy operating
system which will surely satisfy you.
Features of Mac OS X Mavericks
Below are some noticeable features which you’ll experience after Mac OS X Mavericks free download.
Great emphasis on battery life.
Enhancements have been made for power users.
Maps and iBooks now available on desktop.
FacTime included by which you can make video calls.
GarageBand is included which is a comprehensive music studio.
iMovie application included for creating movies.
KeyNotes included for creating impressive presentations.
iPhoto is included for viewing and sharing your photos.
Mac OS X Mavericks Technical Setup Details
Software Full Name: Mac OS X Mavericks 10.9
Setup File Name: Mavericks Installer.dmg
Full Setup Size: 5 GB
Setup Type: Offline Installer / Full Standalone Setup:
Compatibility Architecture: 32 Bit (x86) / 64 Bit (x64)
Before you start Mac OS X Mavericks free download, make sure your PC meets minimum system requirements.
Memory (RAM): 2GB of RAM required.
Hard Disk Space: 8GB of free space required.
Processor: Intel Pentium 4 or later.
Mac OS X Mavericks Free Download
Click on below button to start Mac OS X Mavericks Free Download. This
is complete offline installer and standalone setup for Mac OS X
Mavericks. This would be compatible with both 32 bit and 64 bit windows.
Mac OS X Yosemite Free Download DMG Latest 10.10 build
14A389 Version. It is final bootable Mac OS X Yosemite DMG Multilingual
File For Installation on Mac.
Mac OS X Yosemite Overview
OS X Yosemite is the eleventh major release of OS X from Apple for
Mac computers. It has everything that you can think of with a very
elegant design. OS X has been on changing tides over the years but the
principles remained same. And the principles are power, beauty and
simplicity. Mac OS X Yosemite has been made more powerful and also easy
to use. The looks of the OS have been taken great care of and all the
buttons and icons have been redesigned.
Mac OS X Yosemite has a more cleaner and eye catchy dock. There are
lots of ways of launching your applications but dock i the most
efficient and quick way. Mac OS X Yosemite has made the dock more
comfortable and easy to access. The icons of the applications on the
dock are instantly recognizable and has a consistent look and feel. The
fonts of the OS have also been improved greatly and has been refined
systemwide. There has been extended VoiceOver support for iBooks The
browsing and reading experience in Safari has also been enhanced
greatly. Web rotor assessment has been made quick for Safari. The
transparency of the application can be adjusted according to your needs.
Dictation languages have been increased and now you can dictate in more
than 40 languages.
All in all Mac OS X Yosemite is a very handy operating system with some great new features and new looks.
Features of Mac OS X Yosemite:
Below are some noticeable features which you’ll experience after Mac OS X Yosemite free download.
Introduced with a very elegant design.
More powerful than before.
Easy to use.
Got more cleaner and catchy dock.
Extended VoiceOver support for iBooks.
Browsing and reading experience in Safari has been enhanced.
Application’s transparency can be adjusted.
Dictation languages have been increased.
Mac OS X Yosemite Technical Setup Details
Software Full Name: Mac OS X Yosemite 10.10 Build 14A389
Setup File Name: OS_X_Yosemite.dmg
Full Setup Size: 4.83 GB
Setup Type: Offline Installer / Full Standalone Setup
Compatibility Architecture: 32 Bit (x86) / 64 Bit (x64)
Before you start Mac OS X Yosemite free download, make sure your PC meets minimum system requirements.
Memory (RAM): 2GB of RAM required.
Hard Disk Space: 8GB of free space required.
Processor: Intel Pentium 4 or later.
Mac OS X Yosemite Free Download
Click on below button to start Mac OS X Yosemite Free Download. This
is complete offline installer and standalone setup for Mac OS X
Yosemite. This would be compatible with both 32 bit and 64 bit windows.
If your machine is part of the mainstream configuration, you can
discard the traditional real native partition installation method, while
the use of virtual machine method described in this article, not only
greatly reduce the problems encountered difficult, but also in the use
of Mac OS X to get the experience is excellent the. (This tutorial
configuration needs: support hardware virtualization technology
(Virtualization) of the CPU. Current mainstream Intel Core series and
AMD Athlon series CPU virtualization technology is supported, the name
was Intel VT-x and AMD-V.) Description of the whole process
Preparatory work
Installing VMware
Crack VMware supports Mac OS X
In VMware Install Mac OS X
Finishing work late Preparation
This tutorial method used by the virtual machine, provided that the
machine’s CPU must support hardware virtualization technology. Readers
can be CPU-V or CPU-Z and other tools to test the result. Open CPU
hardware virtualization technology can be turned on via the motherboard
BIOS settings.
Download and install VMware Workstation VMware can go to the official website or on the ed2k network search download (recommended). Described here no longer compile.
Apple systems on Mac OS X installation disc image, use the dmg format
of the original image. I recommend to search for ed2k network download
(recommended), the keyword is “Mac OS X Mountain Lion dmg” or “Mac OS X
Lion dmg”. Described here no longer compile. Crack VMware Workstation supports Mac OS X
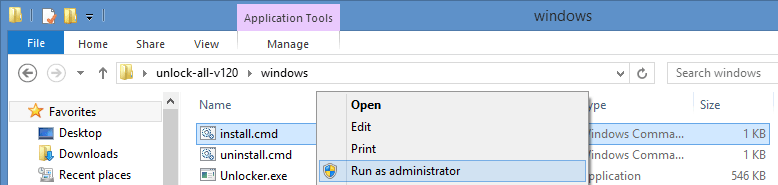
Here we need to use the tool “Workstation and Fusion Mac OS X Unlocker”
VMware Workstation and complete the installation after the restart,
completely unpack Unlocker compressed package to the administrator mode
windows/install.cmd.
Unlocker will automatically stop VMware services, backup VMware
program files, program files crack VMware, restart the VMware service
and a series of operations, and will automatically end the command line
window.
After the break VMware has created a virtual machine system selection dialog:
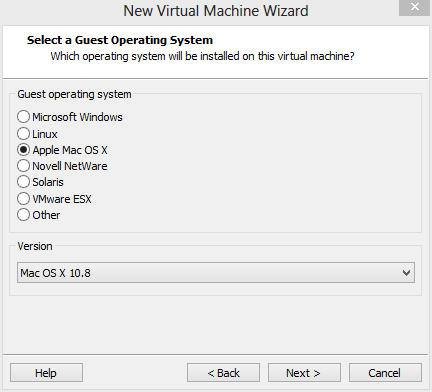
Create Mac OS X, VMware virtual machines
After Unlocker crack, start VMware Workstation normally create a
virtual machine, select “Apple Mac OS X” (depending on the Mac OS
installation disk in the system, select the corresponding version of the
correct version, here I use a Mac OS X Mountain Lion, version 10.8
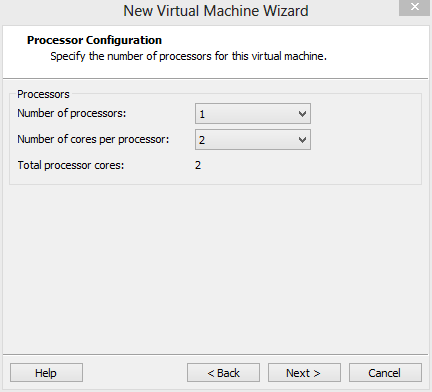
64-bit). Creation process has the following non-default configuration:
(1) in the processor options, select “Number of cores per processor
(each processor cores)” for the two, which can induce a VMware virtual
machine automatically enables advanced hardware virtualization
technology.
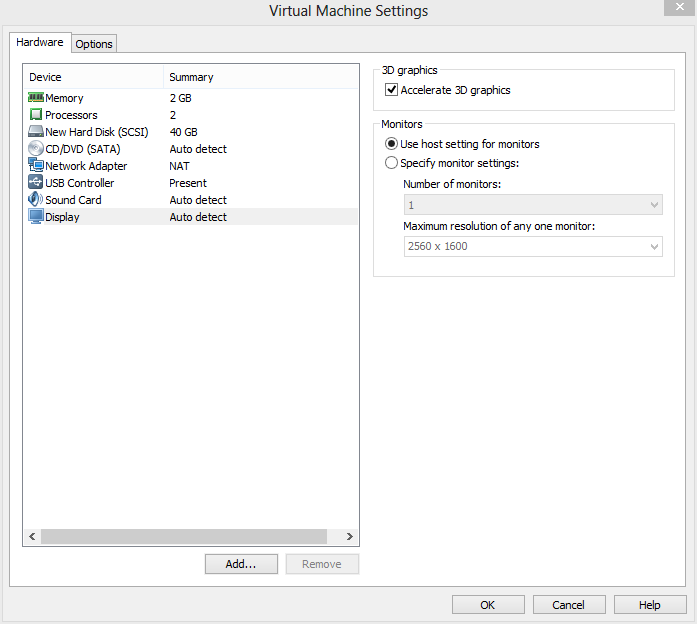
(2) after created, first click on the “Edit virtual machine
settings”, the hardware’s “Floppy” delete option is enabled in the
display “Accelerate 3D graphics”.
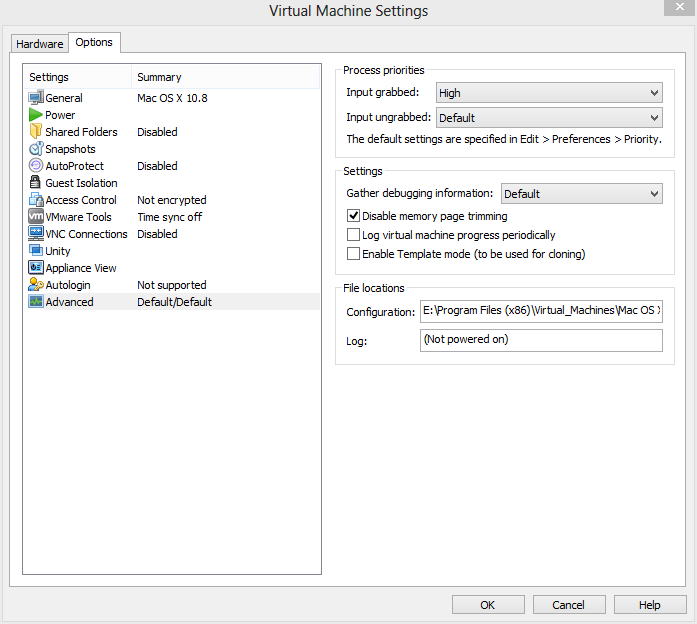
(3) In Virtual machine configuration, in the Advanced Settings, set
the priority of the input capture “high”, and check “Disable memory page
trimming.
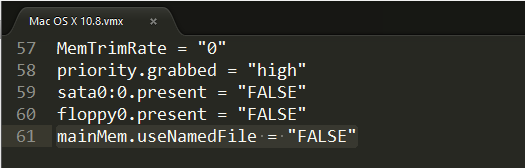
With a text editor (such as Notepad) to edit the virtual machine
files (where the author is E:\Program Files(x86)\Virtual_Machines\Mac OS
X\Mac OS X.vmx), add a line at the end of the file:
1
mainMem.useNamedFile = "FALSE"
This operation is used to disable the VMware virtual machine is
placed on your hard disk memory mirroring prevents the virtual machine
hard disk read and write operation occurs during the busy horrors.
Start the VMware virtual machine and install Mac OS X
Edit the virtual machine configuration “CD / DVD” option in the “Use
ISO image file” at the choice of our Mac OS X installation disc image.
(Please select the browse file dialog box when the file type, select
“All Files (*. *)”, You can see the file name suffix for the dmg image
file.) Confirmation is complete, start the VMware virtual machine.
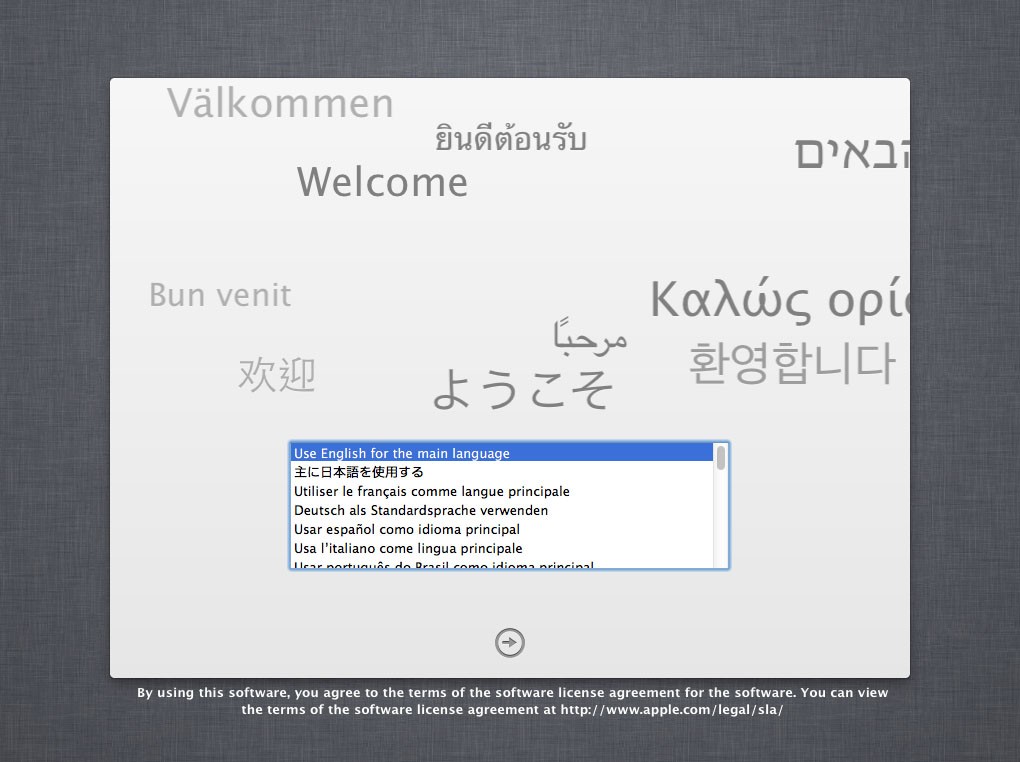
Start the virtual machine, the virtual machine default boot from the
CD, the Apple Logo appears after officially came to Mac OS X
installation interface.
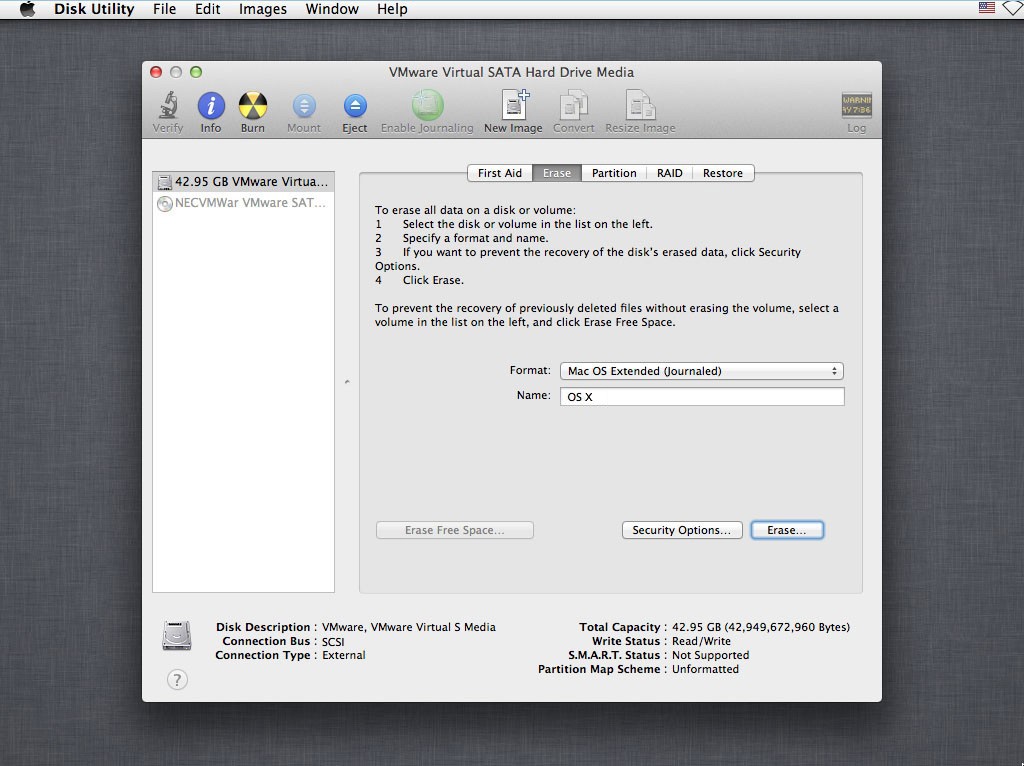
In the “Mac OS X Utilities” select “Disk Utility”, select the first
hard drive on the left and on the right select “Erase” (the “Format”
select “Mac OS X Extended (Journaled)”), Click the “Erase” button to
format the current drive.
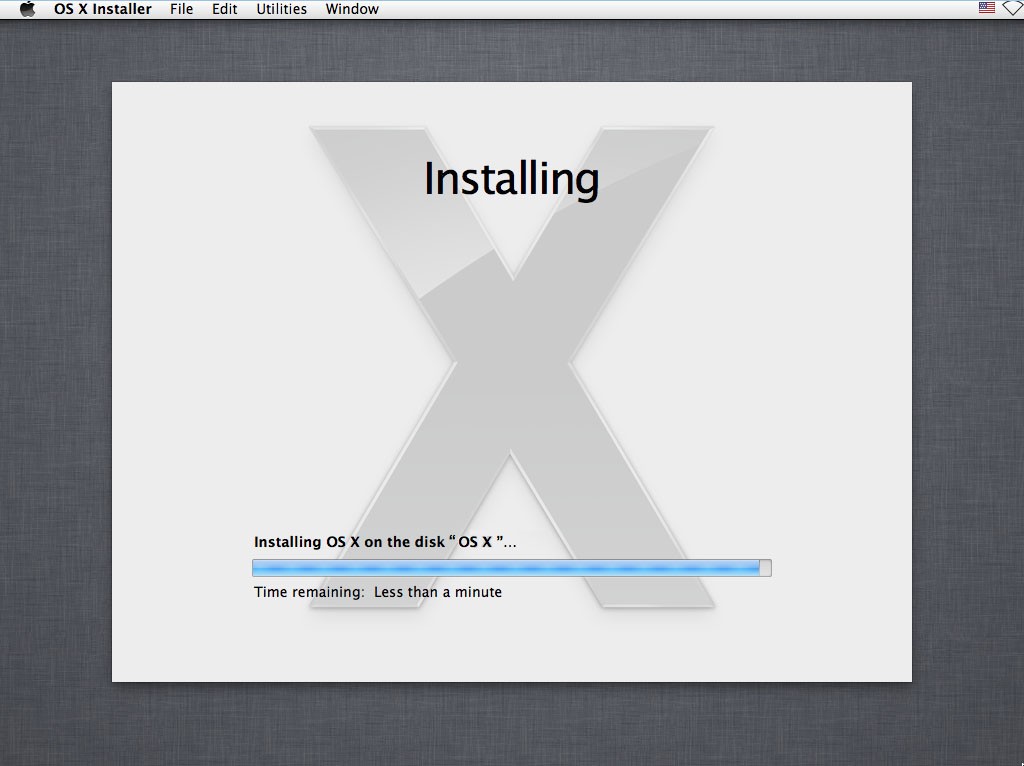
After formatting the hard disk partition, back to “Mac OS X
Utilities” and click “Install Mac OS X”, enter the installation process.
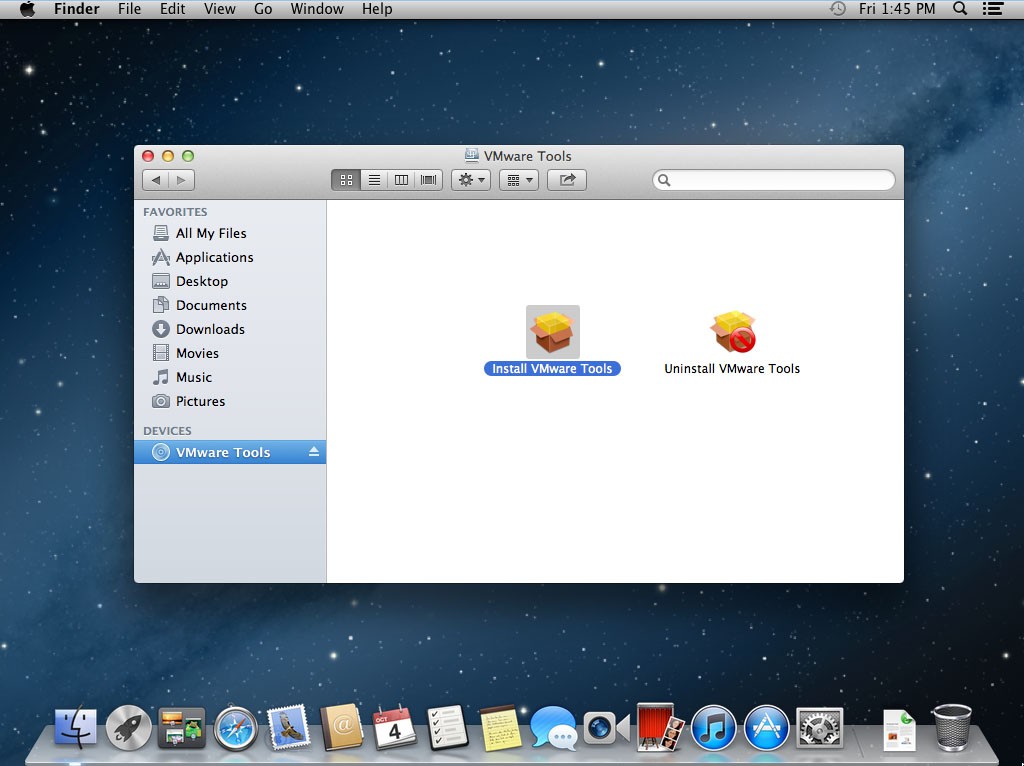
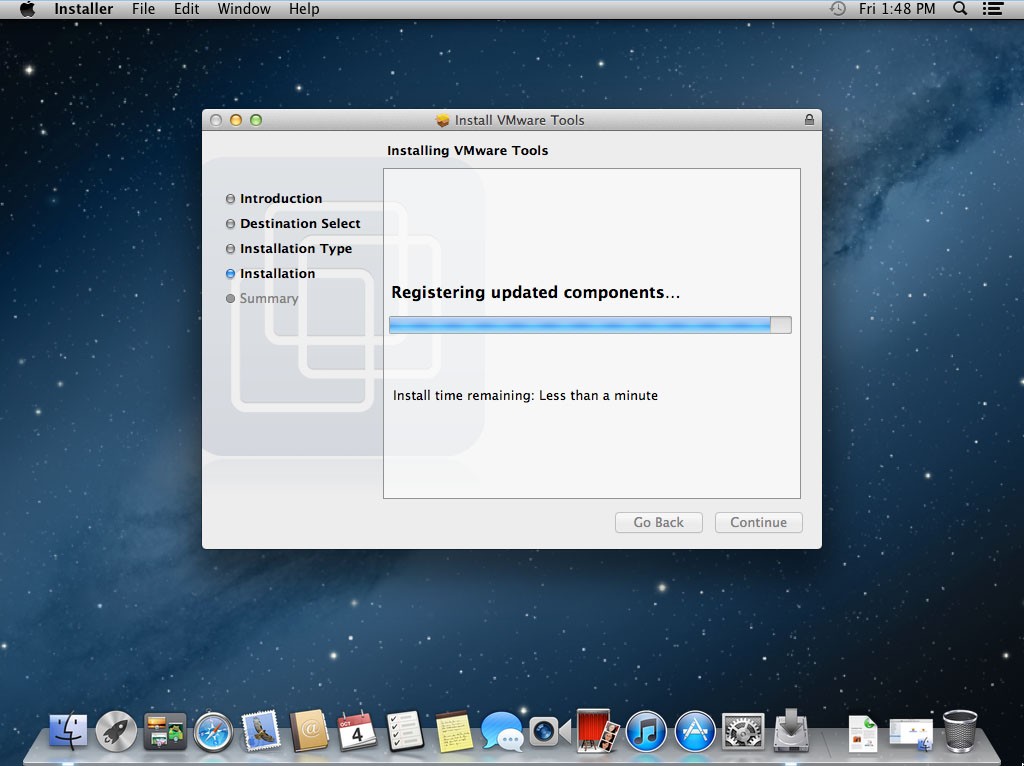
Completed in a VMware virtual machine after installing Mac OS X, the
first thing of course is to install VMware Tools. VMware Tools includes
the VMware virtual machine “hardware” drive, the virtual machine and the
host communication between functional support.
OSX has an ".iso" file reader built into its operating system natively. It's called "DiskImageMounter" and it is the default program for opening ".iso" files.
First navigate to the folder that has the ".iso" file you would like to mount.
Next, right(secondary) mouse click on the file and select "Open With --> DiskImageMounter"
Next, you should now see the software installation package mounted
on your desktop. Simply double click on the install file, and proceed
following the necessary installation prompts.
AnyToISO is the ultimate ISO
creator for Windows and Mac. Create ISO's from almost anything,
including all CD/DVD image formats popular on Internet, CD/DVD/Blue-ray
disks, or simply from a local folder. Complete command-line support. Note: the Lite version is totally free but cannot use files larger than the size of a regular CD (870 MB).
What's New
Version 3.6.3:
Fixed extracting of some ISO files (extracted files appeared broken)
So
you downloaded an .iso or .dmg file, and now you want to burn it to CD
or DVD on your Mac. Fear not! No extra software is required.
The delightfully useful Disk Utility built into OS X can burn disk images to optical media in a few easy steps. Read on for how to go about burning your new disc.
Windows users: You should check out the free ISO Recorder for similar functionality.
Launch Disk Utility (Applications > Utilities).
Insert your blank DVD or CD.Drag
and drop your .dmg or .iso file to the left pane in Disk Utility. Now
both the blank disk and the .iso/.dmg should be listed.Select
the .iso/.dmg file you want to burn to disc, and click on the Burn
button. A dialog box confirming the destination (your blank CD/DVD) will
appear, as shown:
Sit back and wait while your new disc gets written!
All discs burned on the Mac work across platforms; you'll notice in the screenshot that I'm burning the Ophcrack Live CD,
which is obviously for use on Windows. This is a great way to back up
software installation .dmg's to optical disk to free up space on your
Mac's hard drive.
When installing Windows 7 or Windows 8 using an
installation DVD, you might see the message "press any key" or your Mac
might restart to OS X.
This symptom can happen if you try to install
Windows 7 or 8 using a Windows DVD on a Mac that doesn't have a built-in
optical drive. To install Windows 8 on a Mac that displays this
behavior, create an ISO image of the install disc instead.
While started from OS X, insert the Windows installation DVD in an external optical USB drive.
After the DVD mounts, open Disk Utility from the Utilities folder (choose Go > Utilities from the Finder).
Select the USB optical drive so it is highlighted in the Disk Utility window.
Click the New Image icon at the top of the Disk Utility window.
Select DVD/CD master from the Image Format pop-up menu, then choose none from the Encryption menu.
Give the new file a name, then click on Save. The Creating image
dialog appears with a progress bar. It may take some time to create an
image file from your Windows DVD.
Once imaging is complete, quit Disk Utility.
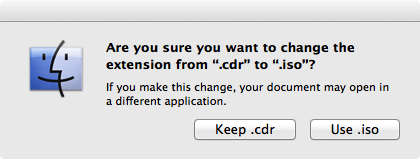
From the Finder, locate the disk image file you created earlier.
Single click on it so its icon is highlighted, then press the Enter or
Return key on your keyboard to rename the file. Change the disk image
file extension from .cdr to .iso. When prompted, click "Use .iso" to
verify this change.
Eject the Windows installation DVD and disconnect your external optical drive from the USB port.
Insert a blank USB 2 flash drive that is a least 16GB in size into a
USB port on the computer. Boot Camp Assistant uses this drive to store
the Windows 8 install media and support drivers during installation of
Windows. Note: This flash drive needs to be formatted for the
FAT32 file system and must use the Master Boot Record partitioning
scheme. Use Disk Utility to check the format of the flash drive before
proceeding, and partition or erase the flash drive if necessary.
From the Go menu in the Finder select Utilities.
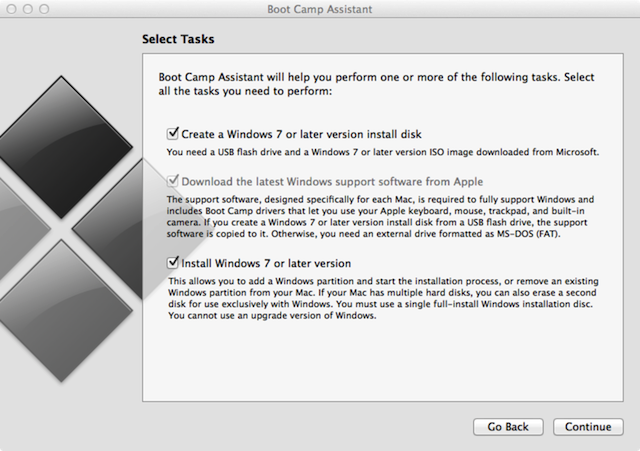
Open the Boot Camp Assistant app in the Utilities folder.
Click Continue.
Make sure the following options are selected (checked) in the Boot Camp Assistant window:
✓ Create a Windows 7 or later install disk
✓ Download the latest Windows support software from Apple
✓ Install Windows 7 or later version
Click Continue.
When prompted to select an ISO image, click Choose, then select the ISO image you created.
Click Open.
When prompted to save Windows drivers by the assistant, select the flash drive you connected as your destination disk.
Click Continue.
A warning message appears letting you know that the next step
erases and reformats the flash drive. Click Continue to erase the flash
drive.
A task status dialog appears with a progress bar. Do not disturb
your computer during this process. Boot Camp Assistant creates Windows
install media on the USB flash drive, and downloads and copies related
Windows drivers to the same drive.
Next, a prompt appears asking for a password to install the Boot
Camp Assistant helper tool. Type in your administrator password and
click Add Helper.
Follow the onscreen instructions to partition your drive and to install Windows.
- If you're asked where you want to install Windows 7 or Windows 8,
select the BOOTCAMP partition, click Advanced, then click Format.
- If you're installing Windows 8.1, select the BOOTCAMP partition, then click Format.
Apple released iOS 8.2 to the public
earlier this week. The new update came with Apple Watch support and
improvements to the Health app. However, if you want to keep your
previous jailbreak, then it’s best you don’t update to iOS 8.2.
The TaiG iOS jailbreak used to work with the first two iOS 8.2 betas,
but Apple managed to patch it in the remaining betas. The final version
of iOS 8.2, released on Monday, also continues to block the TaiG
jailbreak.
MuscleNerd, a prominent member in the iOS hacking community, tweeted that jailbreakers should stay away from iOS 8.2:
Later that day, Stefan Esser also known as i0n1c, tweeted that iOS
8.2 fixes another TaiG bug. This bug was used by TaiG to attain an
untethered jailbreak on iOS 8.2.
The Apple security update states the following:
MobileStorageMounte Available for: iPhone 4s and later, iPod touch (5th generation) and later, iPad 2 and later Impact: A malicious application may be able to create folders in trusted locations in the file system Description: An issue existed in the developer disk mounting
logic which resulted in invalid disk image folders not being deleted.
This was addressed through improved error handling. CVE-ID, CVE-2015-1062 : TaiG Jailbreak Team
Now, we’re not sure if the TaiG team has anymore exploits left, but
it sure looks like Apple is doing all they can to stop future
jailbreaks. The TaiG team did mention that they’ll be releasing a
jailbreak when Apple releases iOS 8.2 to the public. It’s been a few
days since iOS 8.2 released and there hasn’t been any jailbreak yet.
Therefore, if you want to keep your jailbreak, then it’s better you don’t update to iOS 8.2. You’re not going to miss much!
There is currently no tool available to jailbreak iOS 8.2. Apple had patched several vulnerabilities used by the TaiG and PPJailbreak in iOS 8.1.3, and also patch another vulnerabilities in iOS 8.2, so you can’t use the TaiG or PP Jailbreak tool to jailbreak iOS 8.2.
Users who have jailbroken their device on iOS 8.1.2 or lower should
not upgrade their device to iOS 8.2 as one would lose the jailbreak and
it will also wipe out the jailbreak tweaks installed on your device.
You can jailbreak iOS 8.1.2 or lower, so check our jailbreak page for links to the latest tutorials.
We’ll let you know as soon as there is an update on iOS 8.1.3 jailbreak. Don’t forget to join our Facebook Fan page, follow us on Twitter, add us to your circles on Google+, subscribe to our RSS feed or our Daily Newsletter for the latest updates on the iOS 8.2 jailbreak.
Find our latest iOS 8.2 jailbreak coverage below.
Spotlight received a significant overhaul with Apple’s introduction
of OS X Yosemite, making it more powerful and useful than ever before.
Press Cmd+Space and the new Spotlight search bar will appear on the
screen. Just as in the previous version, it’s possible to search through
your files in real time, but what’s really useful is it will now do
currency conversions, simple calculations and word or phrase
definitions. What’s more, the searches provide interactive previews,
which means you can do all sorts of things - send emails, make phone
calls – right within Spotlight.
If you’d like to put your signature in a text document at the end of
an email or even overlay it on to an image, you’re in luck. Preview now
has a feature that allows you to scribble your signature using your
laptop’s (or an external) touch pad. Let’s say you want to sign a
document that’s in PDF format. First, open the PDF using Preview. Then,
click the Toolbox icon in the top right corner. A new Markup Toolbar
will appear. Now click the Sign icon, which looks like a small signature
and is located next to the Text icon. Click Create Signature and follow
the on screen instructions.
Yosemite comes with a Dark Mode, which can be accessed by going to
System Preferences > General and checking the ‘Use dark menu bar and
Dock’ box. This significantly changes the look of Yosemite. The menu bar
and its drop-down menus will now be a dark, slightly translucent
charcoal colour. Almost every app you use will now have dark menus. The
Dock will also be notably darker, but like the menu bar it will also
retain some of its translucency. This is a great feature that can help
battle excessive glare from your screen, plus it looks pretty good too.
Apple
Maps is still in many ways inferior to Google Maps, but recent updates
mean it might be worth taking another look at what’s on offer. The most
useful feature is the traffic option. Open Maps and click the menu on
the bottom left of the screen before clicking Show Traffic. You’ll now
get live traffic updates on many major roads across the UK, including
road closures and road maintenance. There’s also a 3D mode. Click the 3D
button in the middle of the compass on the bottom right of the screen
and the viewing angle will tilt. For the best effect, you should also
click the satellite button in the top right corner. Major landmarks and
buildings can now be seen in 3D. Search for a large city, such as
London, and a 3D Flyover button will appear. Clicking the button will
provide an impressive bird’s-eye tour of the city.
5. Rename large groups of files
This feature is small, but it’s a fantastic time saver. If you’ve
ever had a large amount of files that you’d like to rename, you’ll know
that it can be tedious clicking on each separate file and typing in the
new names individually. In Yosemite, it’s possible to rename these files
en masse. Click, drag and highlight the files you want to rename, right
click your selection and click ‘Rename X Items’, with ‘X’ denoting the
amount of files selected. This brings up a window, which has a list of
naming options. From here you can replace the text entirely, add text
before or after the original file names or format the text in a number
of different ways. For instance, you can index each file and/or add a
custom name. So let’s say you’ve selected fifty image files and you want
to rename them Photo 1, Photo 2, etc. Simply select all fifty, setup a
name and index format and Yosemite will fill the rest in for you.
6. Disconnect from a network without turning Wi-Fi off
Holding down the alt key while clicking on the Wi-Fi icon on the top
right of your menu bar will provide a list of extra options and
information. One of those options allows you to disconnect from a
network without shutting off your Wi-Fi altogether. This is useful if
you’d still like Wi-Fi networks to be discoverable, but for whatever
reason you do not want to be connected to the network you’re currently
using. In previous versions of OS X you could only turn Wi-Fi on or off
from the menu bar, with any additional control or information requiring
users to root through System Preferences, which was both inconvenient
and a bit of a faff. The menu also displays useful technical information
related to the network you’re connected to, such as your Router
Security, IP Address, PHY Mode and Country Code.
7. Quick Type
Quick Type, which was recently implemented in Apple’s mobile
platforms, is also present in Yosemite. For the uninitiated, Quick Type
suggests words or phrases that you’re probably going to type next, based
on your past conversations and writing style. Any time you’re typing in
an app created by Apple, such as Pages, you can press the Escape key
halfway through the word or phrase and a list of options will appear,
allowing you to select the correct one. This may or may not increase
your typing speed, it probably requires a bit of getting used to at
first before it truly becomes particularly helpful, but it’s nice to see
some iOS 8 features making their way to the desktop.
Yosemite and iOS 8 saw the introduction of a lot more connectivity
between your Apple devices, which Apple has dubbed ‘Continuity’. If you
open Safari on your Mac you’ll see there’s a new ‘Show all tabs’ icon in
the top right hand corner, next to the New Tab button. Clicking show
all tabs will reveal the tabs you have open on your Mac, but if you also
have an iPhone or an iPad, it will display any tabs you’ve left open on
those devices too. This also works the other way around - any tabs left
open on your Mac can be viewed in your iOS device. With this feature,
you essentially gain very limited remote control over your Mac, iPad or
iPhone. Perfect if you’ve got some sensitive or embarrassing web pages
open on your loaned iPad and you weren’t sure whether or not you closed
them down or if you want to pick up your browsing from where you left
off on another device.
9. New RSS and search features in Safari
RSS (Rich Site Summary, or Really Simple Syndication) feeds are now
particularly pleasant and intuitive to use in the latest version of
Safari, which was part of the Yosemite update. Click the RSS feed you
wish to subscribe to and Safari will ask if you want to add it to your
Shared Links page. Click add and then click the Show Sidebar icon on the
top left of the browser, next to the forward and back buttons. From
here, you can click the @ symbol and view all of your feeds, including
stories that are being shared by your friends on social media, which has
been available since Mavericks. Click the Subscriptions button at the
bottom to manually add or remove feeds. While functionality is limited,
there are some people who won’t need anything more sophisticated than
this, which means you might not need to use third party feed readers
anymore if you don’t need anything fancy.
Mail Drop allows you to send large email attachments by uploading
your content to iCloud. Simply drag whatever file you’d like to attach
and, provided you have enough space on the cloud, you can send files
well over your mail client’s limit. If the recipient is also using
Yosemite, it will appear as a regular attachment (even though it is
actually on the cloud). If the receiver does not have Yosemite, they
will instead be provided with a link from which they can download the
attachment.
If you’ve ever wanted to record your iPhone’s screen, this is the
easiest and quickest way to do it. First, you’ll need both the latest
version of Yosemite and iOS 8. Next, connect your phone to your Mac with
a lightning cable. Then, open QuickTime and Select File > New Movie
Recording. You should now be presented with your own face, because
Yosemite defaults to your front facing camera. To change this, click the
down arrow next to the red record button and change the camera from
FaceTime HD Camera to your iPhone. Now when you push record, you’ll be
recording your iPhone’s screen.
12. Share your screen
Sharing your screen is a breeze in Yosemite, provided both you and
the person you’re trying to share with is using Apple’s Messages app.
Open your contact’s message window and select the Details button on the
top right hand corner. In the new window that pops up, you’ll see a
share screen icon, which is next to the FaceTime and Call icons. Click
the icon to share your screen and a request will be sent to your
contact, which you can stipulate to either share your screen or to
request access to theirs. This is really useful if you’re trying to show
someone how to solve a problem they might be having with their Mac, or
where they can find specific, buried settings.
If someone calls you on your iPhone, you can answer the call on your
Mac provided you’re using iOS 8 and have the latest version of Yosemite
installed. This is another component of Yosemite’s Continuity, which
seeks to seamlessly connect all of your Apple devices in various
different ways. If you can’t receive calls on your Mac despite having
the latest version of iOS and OS X, make sure you’re signed into the
same iCloud account on all devices. You will also need to be connected
to the same Wi-Fi network and be signed into FaceTime. Wi-Fi calling
also needs to be turned off on your phone which, if you have it, can be
found in Settings > Phone. Making a call is as easy as accepting one,
just open your contacts folder and click their phone number. If you
find all of this too intrusive, you can stop calls from coming via your
Mac by opening the FaceTime app and clicking FaceTime > Preferences
and deselecting iPhone Cellular Calls.
Here’s another feature that was first made available on iOS that has
now been introduced to OS X. If you still want to be notified of
messages but you also don’t want a specific person bothering you all the
time, you can now mute individual people, rather than being limited to a
blanket Do Not Disturb mode. To access this, open your Messages app,
double click the person you wish to mute, click the Details button in
the right hand corner and select the Do Not Disturb box.
The Notification Centre now has widget capabilities, much like the
widgets found in the Notification Centre on the iPhone or iPad in iOS 8.
On your Mac, click the three bullet points in the top right hand corner
on your menu bar and then click Edit at the bottom of the sidebar that
appears. From here you can add or remove widgets that you already have
installed on your system. You can also quickly access the App Store at
the bottom of the screen, where you can browse, purchase and install
additional widgets.
Thanks to Continuity, any SMS messages you receive on your iPhone can
also be read on your Mac, even if the person you’re texting doesn’t own
an Apple device. What’s more, you can also send SMS text messages via
your Mac using the same feature. To do this, make sure you have the
latest version of iOS and that you’re signed into iMessage on your
iPhone. You also need to be signed in with the same Apple ID on your
phone and your Mac. Now take your iPhone and go to Settings >
Messages > Send and Receive > You can Be Reached By and make sure
your email address and phone number is selected. Go back to Messages and
under Text Message Forwarding, select the device you wish to use. After
you’ve entered a security code, you should be able to send and receive
SMS messages from your Messages app on your Mac.
If someone has sent you a PDF or an image as an attachment in an
email, you can now annotate it without leaving Apple Mail. To do this,
make sure you have ‘Include original attachments in reply’ selected by
going to Edit > Attachments in the Mail app’s menu bar. Now that this
is enabled, click reply and hover over the image or PDF. A small arrow
will appear in the top right hand corner. Click this arrow and select
Markup. A new window will open, allowing you to add lines, boxes, text,
even your own signature to the PDF/image. Click Done when you’ve
finished annotating, before emailing your new version back to the
sender.
18. Private browsing
Another great new feature in Safari allows you to set DuckDuckGo (a
search engine that claims not to track you) as your default search
engine. Click Safari > Preferences > Search and set your Search
Engine to DuckDuckGo if you would like to enable this. While we’re on
the subject of privacy, it’s worth noting that Private Browsing has now
changed a bit. Previously, Private Browsing was either on or off. Now,
you’re able to have a private window open as well as a regular window
open at the same time. This is a feature that’s been available on rival
browsers for years, so it’s nice to see it finally arrive on Safari.
19. iCloud Drive
iCloud Drive functions much like DropBox, allowing you to save your
documents, music, photos, videos and numerous other apps and files on
Apple’s own file hosting service. This is really useful if you like to
work across multiple devices and it’s a great way to backup your files.
iCloud Drive is located in your Finder window by default, under
favourites. Getting your files on the cloud is as simple as dragging and
dropping into the folder. You can also save directly into the folder
from most of Apple’s own apps. All users get 5GB of space completely
free with up to 1TB of space available for a monthly fee.